Sunday, November 16, 2008

Curvy Corner

During your net surfing you may have seen web site which contain rounded box. These rounded box are created by the images which contain the rounded corners and the border as well. So web developer like me who don't have idea of adobe photoshop or tools which are used to created these images have to learn the tool first to create the rounded images and then use them in there web site. or you may ask the graphics designer to create images for you as per your need. But a good new for developer like me who don't have knowledge how to create rounded image they can create rounded box without any image. Curvy Corner is the javascript code use to create the rounded box and it is really easy. Curvy Corner is a javascript file you can use it to created the rounded box. In this article i will try to demonstrate how you can use the curvy corner javascript code to create the rounded box.
First of all you have to download the latest verion of the curvy corner file from here. In the folder you have extracted from the downloaded zip file you will contain two javascript files

1- curvycorners.js which is compressed file and its size is 16 k
2- curvycorners.src.js which uncompressed file and its size is 47k and is is readable

and also the demo html file as well and some other stuff related to th demo html pages.
First you have to place the curvyCorner.js which is of 16 k in javascript folder of your project or any where you like i have placed it in js folder of my project.

in my .aspx page in the header firt i have include the javascript file by setting the src property of the script tag

src="Js/curvycorners.js"

and i have write the code to create the divs here is example code image i have only shown the div tag and there properties settings.


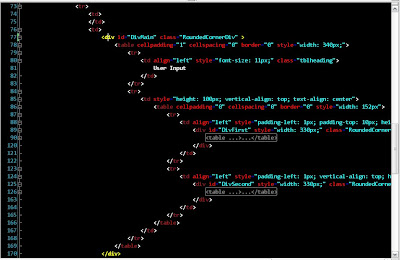
from the image you can see i have created outer div which contain two divs.The java script to round the corner of the inner div and the bottom corner of the outer div is as below.

function OnloadFunction()
{
settings = {
tl: { radius: 7 },
tr: { radius: 7 },
bl: { radius: 7 },
br: { radius: 7 },
antiAlias: true,
autoPad: true
};

MainDivsettings = {
tl:false,
tr:false,
bl: { radius: 5 },
br: { radius: 5 },
antiAlias: true,
autoPad: false
};

var DivFirst=document.getElementById('DivFirst');
var DivSecond= document.getElementById("DivSecond");
var DivMain = document.getElementById("DivMain");

var DivFirst = new curvyCorners(settings, DivFirst);
DivFirst.applyCornersToAll();

var DivSecond= new curvyCorners(settings,DivSecond);
DivSecond.applyCornersToAll();

var DivMain= new curvyCorners(MainDivsettings,DivMain);
DivMain.applyCornersToAll();

}

The Settings
The first part of the previous example creates a variable called settings, you can change this to any variable name you want, you will need to use this variable later on in the script. This variable holds all the settings needed for the curvyCorners object to work. Each line of the settings object is a particular setting, for example the first line tl: { radius: 7 }, tells the script that you want the top right corner of your box to have a 7 pixel corner radius. The next three lines set the radiuses for the other three corners.

if you don't want the corner to be rounded and the corner remain the square then you can set that corner value to be false. In the example javascript code i don't want the top right and top left corner of the outer div to be rounded so replace the bracketed section to the right of each colon (:) with the keyword false. See example the MainDivsettings in the above code.

Anti-Aliasing?


Changing the value of antiAlias from true to false will toggle the anti-aliasing. Turning off anti-aliasing will reduce the smoothness of the corners but will greatly increase the rendering time required to draw the corners.


Padding?


The last setting is called autoPad. Again this can be set to either true or false. By default and DIVs that make use of the curvyCorners can't have padding applied. This is because the padding messes up the corners that curvyCorners generates.


you can find more detail about how to use curvy corner by clicking here


the css class i have used for my code example is


.RoundedCornerDiv
{
border: #6593cf 1px solid;
padding: 2px 2px 2px 2px;
margin: 0px auto;
color: #000;
background-color: #f1f5fa;
}


and the output of my example is as below


Enjoy rounded corner box without images :)

and output with the firefox is even better


Saturday, November 15, 2008

Consolas Font Pack for Microsoft Visual Studio 2005 or 2008

Microsoft consolas is the font microsoft has design for the IDE like studio 2005 and 2008 and is Optimized for Microsoft ClearType. The Microsoft Consolas Font Family is a set of highly legible fonts designed for ClearType. It is intended for use in programming environments and other circumstances where a monospaced font is specified. This installation package will set the default font for Visual Studio to Consolas. I have using Microsoft Consolas for 10 to 12 days and i really like this font.


You can download version 1.0 of Microsoft Consolas from here and install the font.


The font is really cool and you will also like this font when you spend some time with this font. There is some little error if you look at the font.


if you look at the character M then it is not looking good i hope microsoft will correct it in the next release of consolas

Friday, November 14, 2008

Visual Studio Theme

I was always looking for new look in every think like window theme, and in web applications and want to create and search new look of the web applications on the net and spends hours and hours, I also use to try new thing in the Visual Studio editor as well, the one thing which i do whenever i use new pc for development or i install new visual studio is to change the font and the color of the string in between double quotes and i like string in the format like
"This is the Test String"

After my Search on net i have found serveral theme regarding visual studio 2005 you can try yourself and download from here and also look at this link as well.

as i have downloaded my favorite and using it :)


How to Use Theme ?

First you have to download one of your favorite theme fromt the link i have mention above and you will get the zip file which you have to extract and you will ge "Darkness.vssettings" . and here are the steps you have to follow thAdd Imageese steps.


Go to the Tools->Option and then
Step 1: Select Import and Export Settings
Step 2: Check the "Use Team Settings file" option
Step 3: Click the Browse button to locate your File.vsssettiongs file

Enjoy new theme.

Saturday, November 8, 2008

Parse and TryParse Methods - Difference

I have a question in mind for last 1 to 3 months but during this period i was very busy and didn't get time to get answer to my question. The question was
"What is difference between the Parse and TryParese Method ?"
Now i got the time and get answer of my question and the answer to my question is given by Blogging Developer
You can read this article and you will fine what is the difference between the Parse and TryParse method, in this article author also compare them with the convert method but as my question was difference between the Parse and TryParse so here is the difference between them.

Parse: This function takes a string and tries to extract an integer from it and returns the integer. If the string is not a numerical value, the method throws FormatException. If the extracted number is too big, it throws OverflowException. Finally, if the string value is null, it throws ArgumentNullException.
Example: Int32 intValue = Int32.Parse(str);


TryParse: This function is new in .Net 2.0. Since exception handling is very slow, TryParse function returns a boolean indicating if it was able to successfully parse a number instead of throwing an exception. Therefore, you have to pass into TryParse both the string to be parsed and an out parameter to fill in. Using the TryParse static method, you can avoid the exception and ambiguous result when the string is null.

Example : bool isParsed = Int32.TryParse(str, out intValue);


From the above reading you can see that Parse function will throw 3 exceptions which are
1- FormatException
2-
OverflowException
3-
ArgumentNullException

mean when you are using Parse function then there is possibility of 3 exception and when you are using TryParse then there is no such exception only you need to check the Boolean value which is return from the TryParse Function. So my Recommendation is try to Use TryParse and avoid the exceptions.

Wednesday, November 5, 2008

Jquery Word Counter

During my search on net i have come up with the plug-in for jquery name word counter, develop by Roshan Bhattara , you can download the demo project from there and also read about the word counter for the text area, i have used that plug-in and that is very nice and good, during my testing i have modifed the code for that plug-in and here is the code for you to so that it will be helpfull for you

jQuery.fn.wordCount = function(params){
var p = { counterElement:"display_count" };
var total_words;
if(params) { jQuery.extend(p, params); }

this.keypress(function()
{
var
passedValue = jQuery.trim(this.value);
CountWords(passedValue);
});

function handlePaste()
{
var
strInputFieldValue = $(this).val();
var strClipboardText=window.clipboardData.getData("Text");
strInputFieldValue = strInputFieldValue + strClipboardText;

CountWords(strInputFieldValue)
}

function CountWords(strValue)
{
var
wordArray = strValue.split(/[\s\.\?\,]+/);
if(wordArray[wordArray.length -1] == '')
total_words=wordArray.length-1;
else
total_words=wordArray.length;

if(strValue.length == 0)
total_words = '0';

jQuery('#'+p.counterElement).html(total_words);
}


$(this).bind('paste',handlePaste);

};

I have added the paste event which will handle paste event whenever the use paste some text and also the modification of the keypress function . hope this will be help you and again credit goes to Roshan Bhattara for his effort.

And here is the code to call the above plug-in functions

$(document).ready(function()
{
$('#word_count').wordCount();
});

You can download source code from by Clicking here

You can download source code of the word count limit by Clicking here, i have updated the code now it will limit the number of word in the text area.The only problem is that it will create is that it will allow an extra word when limiting. If anyone have suggestion please let me know i will be thankful to him/her :)

Tuesday, November 4, 2008

Serial Number in Sql Server Select statement

During one of my task in daily routine i come to problem where i need addition column in the select statement of the sql server. And after the research on the net i have found a link which gave solution to my problem. Vmaceda has give the solution of how to get the serial number in select statement, both for sql server 2000 and also for sql server 2005, just for my friends i write the select statements which i have used and for there easyness.

For Sql server 2005
SELECT Column1 ,Column2 = ROW_NUMBER() OVER(ORDER BY Column1),
FROM tblTableName

For Sql Server 2000
SELECT ( SELECT SUM(1) FROM tblTableName WHERE Column1 <= tableName.Column1) AS 'Serial Number'
FROM tblTableName tableName

Monday, November 3, 2008

Single RadioButton Selection in GridView

During my development work i came across a problem when i have to insert the RadioButton control in the grid view control and have to select the only one radio button at a time, i have use the radio button property groupName but it didn't work, So after search on net i came to know what the problem is the link which i have read and i came to know that the radio button groupName property is not working is Dan's Archive , where he mention that "Each row in a GridView is its own naming container so the controls' names don't collide. However, RadioButtons do not support spanning multiple naming containers and having their groupname attribute still work correctly. We will be looking at solving the RadioButton GroupName/multiple naming container issue in future versions of the product." he also give solution to the problem , but the solution which i will present here is different from that solution.

here is the javascript code

function SelectSingleRadioButton(currentRowRadioButtonID)
{
var radioButton = document.getElementById(currentRowRadioButtonID);

var targetBaseControl = document.getElementById('<%= grdvGridViewName.ClientID %>');
var gridViewInputControls = targetBaseControl.getElementsByTagName("input");
for(var intCounter = 0; intCounter < gridViewInputControls.length; ++intCounter)
{
if(gridViewInputControls[intCounter].type == 'radio')
gridViewInputControls[intCounter].checked = false;
}

radioButton.checked = true;
}


at the end on the server side you have to put the following code


protected void grid_RowDataBound(object sender, GridViewRowEventArgs e)
{
if (e.Row.RowType == DataControlRowType.DataRow)
{
RadioButton rdbCurrentRadioButton = (RadioButton)e.Row.FindControl("RadioButtonName");

e.Row.Attributes.Add("onclick", "SelectSingleRadioButton('" + rdbCurrentRadioButton.ClientID + "');");
}
}

and you will select one radioButton at a time
Happy Propgramming :)

Sunday, November 2, 2008

Loop Through GridView

Here is code which will loop through the grid view and access each row and the cell of the each row