Sunday, July 25, 2010

Digital Clock In Silverlight 4

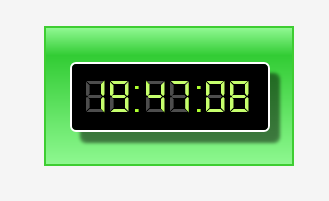
In this post I will show you how to create the digital clock and how to use the different fonts in your silver light application. I have create small silver light application to create the digital clock and I have used font which is not installed on my system. And I have used the MVVM practice to bind the different properties of the control on my view , in this example I have used on text block control and I have bind the text and the margin properties of the text block control. Below are the two Image of my silver light clock application , In the first image you will see only the clock and in the second image you can see the tool tip of the clock which will show some extra information.


Here you can see that I have displayed the current date, month day , week day name and year day which in my case will show the 205 of the date 07/24/2010 the image taken on that date.


Let us start with our code, I have created view model and view folder to store the view view folder and the classes in the view model folder.

View Model
             In the view model folder I have only one class with the name DigitalClockViewModel which is used in the view of the digital clock to bind the properties of the control in the view. I have displayed the time of the day in 24 hours format and the clock will show the hours, minute and second. For each of one hour, minute and second I have two properties one for the first digit and second for the second digit as I have used 6 text block to show the whole time. So I have created 6 properties with the name, FirstHour, SecondHour , FirstMinute, SecondMinute and FirstSecond and the LastSecond as SecondSecond didn't have meaning. I have also used the margin property for each of the text block in the view as When 1 is display on either of the text block then their alignment disturb. So I have two different margin for each of the text block one which is used then the hour, mint or second has one (1) and second margin for 2 to 23 hour and 2 to 59 minute and second fields.
Below is my code which is written for one part mean for the hours part, here you can see that I have one property to set the hour value and second property to set the margin of that hour half. You can see that I have also raise the Property change event to let the view knows that value of the property is change and view will update the value.
public string FirstHour { get { return strFirstHour; } set { strFirstHour = value; RaisePropertyChanged("FirstHour"); } } public string FirstHourMargin { get { return strFirstHourMargin; } set { strFirstHourMargin = value; RaisePropertyChanged("FirstHourMargin"); } } public string SecondHour { get { return strSecondHour; } set { strSecondHour = value; RaisePropertyChanged("SecondHour"); } } public string SecondHourMargin { get { return strSecondHourMargin; } set { strSecondHourMargin = value; RaisePropertyChanged("SecondHourMargin"); } }

Here is my code which is used in the dispatch time click event which will fire every second. I have used some portion of the code to explain you rest of the code is similar to the this. Here you can see that I have set the FirstHour property by getting the Hours from the dateTime. And then assign the second character of the FirstHour string to the SeconHour and the first character of the FirstHour to FirstHour property. As I have used the HH notation I will get two string that will represent the hour.
FirstHour = DateTime.Now.ToString("HH"); SecondHour = FirstHour.ToCharArray()[1].ToString(); FirstHour = FirstHour.ToCharArray()[0].ToString(); if (FirstHour == "1") FirstHourMargin = "0,2,-2,2"; else FirstHourMargin = "0,2,0,2";

Now in the second part which is used to set the margin of the text bloc control. Here you can see that I have place if condition to check for the string 1 if the value is 1 then I have set the right side margin to -2 and if the value is other then 1 then I have set the margin on the right side to 0. By doing this I will place the two text block on each other as if the value is one then the text block which is on top of the dimmed text block will not fit on the text block which is behind that text block.

View
On the view side here is my important code, Here you can see that I have FontFamily property which is the user control property and is set at the top. I have placed my digital font file in the separate folder name Resource. So here I have set the path of the resource file which is used in this case for the font. You can also set the individual font of the control by setting the FontFamily property. As I have set the font family property of the user control so all the control on this user control will have same font. except for the template which is defined in this user control.
FontFamily="../Resource/DS-DIGI.TTF#DS-Digital,Segoe UI" < TextBlock Margin="{Binding FirstHourMargin}" Text="{Binding FirstHour}" FontSize="48" Foreground="GreenYellow" VerticalAlignment="Center" HorizontalAlignment="Right" Grid.Column="1"/> < TextBlock Margin="0,2,0,2" Text="8" FontSize="48" Foreground="White" VerticalAlignment="Center" HorizontalAlignment="Right" Grid.Column="1" Opacity="0.3"/>

The next two line are used to display the value for the hour. Here you can see that I have used two text block for single digit display in the first control I have bind the margin and the text property with the properties in the view model and I have set the color of the text to the yellow green for the text block, For the second text block I have set the foreground to white and the opacity of the this text block is set to .3 so that it will displayed as dim value. and this is all about my digital clock hope you like this post you can download the source code from here

All and any comments / bugs / suggestions are welcomed!
 

Saturday, July 17, 2010

Line Series Chart In SilverLight 4

During my development in silver light 4 I came across this problem when I have to show large amount of data using the charting control provided in the silver light 4 toolkit. The problem what that when you show small data then it will look nice and good looking , but when you need to display large data in the charting (Line series ) control then the values are overlapped and will not show properly in the x-Axes.
The problem was that I have to show the values against time in the line series chart. So the date time value is shown along the x-axes and the integer value is shown along y-Axes. Below is the main screen when I display the 96 record for the 4 days and you can see that the overlapping of the value on x-Axes , user can't read the value on the x-Axes. I have search heard on the google but can't find any thing regard the overlapping of the x-Axes values. So I decided to go with my own way and here I will give you one of the solution to this problem.

The solution to the problem is very simple which come to my mind,Just place the chart control in the scroll viewer control and then set the width of the chart control dynamically, depending on the number of days. I have set the 1440 for one day and if the number of days increases then multiple the 1440 with the number of days and set the width of the chart control.

Here is my xaml code which is used to define the axes. Here you can see that I have set the date time axes along the x-Axes , the orientation property and also the set the interval ,mean the difference between the two point on the x-Axes and also set the showGridLines property to true to show the grid line on the chart. You can see that I have also set the style of the date time axes and set the string format for the date to be displayed on x-Axes.

< charting:Chart.Axes>
< charting:DateTimeAxis Interval="2" IntervalType="Hours" Orientation="X" ShowGridLines="True" >
< charting:DateTimeAxis.AxisLabelStyle>
< Style TargetType="charting:DateTimeAxisLabel">
< Setter Property="StringFormat" Value="{}{0:dd/MM/yy HH:mm}"/>
< /Style>
< /charting:DateTimeAxis.AxisLabelStyle>
< /charting:DateTimeAxis>
< charting:LinearAxis Orientation="Y" ShowGridLines="True" />
< /charting:Chart.Axes>

Below is the line of code which is used to set the width of the chart control here you can see that I have multiple the 1440 value with the number of days by substructure the current date from the total days, by adding the counter value using addHours and then use the day + 1 to multiple it with 1440.


chrtChart.Width = 1440 * (((TimeSpan)DateTime.Now.AddHours(intCounter).Subtract(DateTime.Now)).Days + 1);
By doing this my problem of view large amount of data is solved .You can download the source code from here
All and any comments / bugs / suggestions are welcomed!

Sunday, July 11, 2010

Photo Viewer using Silverlight

When I looked it first time Beauty and Fashion on msn, the image displayed and some of the information about the image shown, I really like it and I want to create for myself, in silverlight. So here is my application which is similar to this and I hope you will like it. Here is the screen shot of my application and the source code download link will be provided at the bottom of the post.

The application is simple one, I have used few control like Image control, list box control and also text block to show some of the information for the image which is currently selected from the list box control, and for the layout I have used grid. I have added all the images in the image folder.Starting from the code Behind I have created one class which is ImageCollections and I have create ImageURL, ImageName and ImageDescription three properties for the image collection class. Then in the Loaded event of the user control I have bind the ItemsSource of the list box control to the list of the Image collection by calling the static method getImageCollection defined in the ImageCollection class ( which is placed in the classes folder).

Now moving to the xaml of the main page. Here I have used the grid layout for the display of the control and one of my most used layout control. I have set 3 rows and columns for the main layout grid and then inside that grid one more grid to show the main display area. The display grid which consist of two rows the second row consist of height of 150 and remain will be allocated to the first row which show the main display image ( the larger image in the application and also the some detail of the image). In the second row I have used the list box control to show the image in smaller size and set the orientation of the list box item to horizontal. In the first row the main image will be display which is selected from the list box. and plus some of the detail of the image comes up. I have used two story board for the grid which will show the detail of the image , one to increase the height of the detail grid and second one to decrease the height of the detail grid. You can see the transparency of the detail grid.

Hope you like the application and idea behind the application. which is taken from the Beauty and Fashion from msn. You can download the source code from here
All and any comments / bugs / suggestions are welcomed!

Saturday, July 10, 2010

SilverLight 4 DataGrid Control

I have just started my work in the silverlight 4. Here is the my first post on the silver light 4 control. In this post I have used the data grid control of the silverlight 4, which is one of the my favorite control in every framework. Below is the main screen of the my application here you can see that I have Data grid control at the top , which shows the First name, Last Name, Gender, Date of Birth and the email id. And also I have used the text box , date picker and button control in that form as well.

And below is the my screen shot when user click on any of the row in the grid control. I have used the binding. So each of the text box is bind to the corresponding field in the data grid control, First name text box is bind to the First name text box , Last Name is bind to the Last Name text box and so on. And two button controls which are doing nothing, they are just displayed here.


I have divide my application into three parts model, Model view and view (MVVM). I have create folder for model and model view but not for the view as my main form is the only view and I have created one model and model view for the main form. I have also create converter folder which I will explain as below.
1- Model
In model I have person class which has the first name, last name, gender , email address and the date of birth. The person class is inherit from the INotifyChangedProperty so that I have raise the property change event and send the latest value to the view, when value of any of the property is changed. As I have bind the first name and the last name to the header , to show the person full name in the header, when the value is changed in the first name and last name text box then it will be send back to view and the latest value are shown in the grid column and also in the header of the form. The remain fields are also updated in the data grid columns.

View Model:
In the view model I have two properties one which return the list of person class and one which hold the current selected record of the data grid control which are PersonCollections and SelectedRecord. The person collection property which hold the all the person list will be bind to the ItemSource of the data grid control and the SelectedRecord property is bind to the SelectedItem property of the data grid control. In the view model I have raise the property change for the SelectedRecord property. And then Properties of the SelectedRecord property is bind to the Individual control like first name, last name, data of birth , gender and the email address.

Converters:
The converter folder contain two converter. One to convert the datetime to only date part to show the date of birth, as If displayed directly the whole date and time is displayed, so in order to show only date the converter is used. Second one is the BooleanToVisibilityConverter class which is used to set the visibility of the textblock which is placed between last name and first name the comma (,) sign, I want to hide the text block if the first name is empty string. If the first name is empty then only the last name is shown but if the first name is not emty then the comma (,) symbol is placed between the last name and the first name.


Hope you get starting point of the data grid in silverlight by separating the view model and view.You can download the source code from here
All and any comments / bugs / suggestions are welcomed!

Sunday, July 4, 2010

Currency Conversion Using Web Service

For this post I have used the web service which are free to use. I have used the currency conversion from one country currency to another country currency rate. Below is the screen shot of the example application. The GUI is very simple as you have to select from the conversion from currency and then select Conversion to currency and press the convert button.

In the application I have used the two combo Box for the selection of the currencies and one button to call the web service to convert the currency from From currency to To currency. What I have learn from this post is how to bind the selected item with the text box text property. Which I would like to share with you. Below is the code to bind the selected item from the combo box with the text block text property, the text blocks are placed at the title place to let you know about which currencies are selected.

<TextBlock Margin="4,0,0,0" VerticalAlignment="Center" Text="{Binding Path=SelectedItem.CurrencyName, ElementName=cboConversionFrom, Mode=OneWay}" TextWrapping="Wrap" Grid.Column="1" Foreground="{StaticResource CheckBoxBrush}" />

Here you can see that Text property of the text block, I have set the path of the to selectedItem.CurrencyName and the element name is cboConversionFrom. Every time the selectedItem from the cboConversionFrom change the text property is also changed.

To consume the asmx service I have create asmx service in my web project which will be consumed by the silverlight project. For the communication purpose the service should be running when you made web service call.You can download the source code from here
All and any comments / bugs / suggestions are welcomed!