Wednesday, September 23, 2009

Inserting Inside Using Jquery

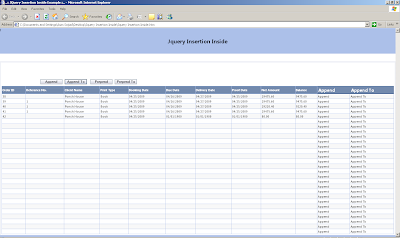
In this Post I will show you how you can insert the new elements at run time in web application, using jquery library. Below is the image of the example source, which consist of table and four button control. Append, Append To, Prepend and Prepend To are used as button.Let us start our example.


1- Append
The first way to add the new element to the exist element is the use of the append function. Below is the code which is execute when user click the append button on the main form. In the click event of the append button I have used the append in the first statement which is used to add the column in the first line and then in the each selector (which is used to add the columns in the remain rows of the table. It will used to insert new column at the end.

$("#btnAppend").click(function()
{
$('#tblMainTable tr:first').append("<td class='TableHeading'>Append</td>");
$('#tblMainTable tr:not(:first)').each(function(){
$(this).append("<td class='tdMiddleCells'>Append</td>");
});
});
Here is the syntax of the append function.
.append(content)
Parameter for the append function is the content, A selector, element, HTML string, or jQuery object to insert at the end of each element in the set of matched elements. It will return jQuery object, for chaining purposes.

2- Append To
The second way to insert the new element is by use of the appendTo function which do the same task as the append function do. The only difference is in the syntax—specifically, in the placement of the content and target. With .append(), the selector expression preceding the method is the container into which the content is inserted. With .appendTo(), on the other hand, the content precedes the method, either as a selector expression or as markup created on the fly, and it is inserted into the target container.
$("#btnAppendTo").click(function()
{
$("<td class='TableHeading'>Append To</td>").appendTo('#tblMainTable tr:first');
$('#tblMainTable tr:not(:first)').each(function(){
$("<td class='TableHeading'>Append To</td>").appendTo(this);
});
});
Here is the syntax of the appendTo function.
.appendTo(target)
Parameter for the appendTo function is the target, A selector, element, HTML string, or jQuery object; the matched set of elements will be inserted at the end of the element(s) specified by this parameter. It will return jQuery object, for chaining purposes. Here is the output of the both append and appendTo calls.


3- Prepend
The third way to insert new element is the use of the prepend function. This operation is the best way to insert elements inside, at the beginning, of all matched elements.
$("#btnPrepend").click(function()
{
$('#tblMainTable tr:first').prepend("<td class='TableHeading'>Prepend</td>");
$('#tblMainTable tr:not(:first)').each(function(){
$(this).appendTo("<td class='TableHeading'>Prepend</td>");
});
});

Here is the syntax of the appendTo function.
.prepend(content)
Inserts content, specified by the parameter, at the beginning of each element in the set of matched elements.Parameter for the prepend function is content, An element, HTML string, or jQuery object to insert at the beginning of each element in the set of matched elements. It will return jQuery object, for chaining purposes.

4- Prepend To
The fouth way to insert the new element is by using of the prependTo function which do the same task as the prepend function do. The only difference is in the syntax—specifically, in the placement of the content and target. With .prepend(), the selector expression preceding the method is the container into which the content is inserted. With .prependTo(), on the other hand, the content precedes the method, either as a selector expression or as markup created on the fly, and it is inserted into the target container.
$("#btnPrependTo").click(function()
{
$("<td class='TableHeading'>Prepend To</td>").prependTo('#tblMainTable tr:first');
$('#tblMainTable tr:not(:first)').each(function(){
$("<td class='TableHeading'>Prepend To To</td>").prependTo(this);
});
});
Here is the syntax of the prependTo function.
.prependTo(target)
Parameter for the prependTo function is the target, A selector, element, HTML string, or jQuery object; the matched set of elements will be inserted at the beginning of the element(s) specified by this parameter. It will return jQuery object, for chaining purposes.
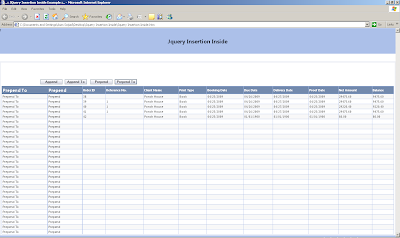
Here is the output of the both the prepend and prependTo calls.


You can download the source code from here
All and any comments / bugs / suggestions are welcomed!

Tuesday, September 15, 2009

Changing Hyperlink Color, Place In GridView Control

I still remember my time when I have used the hyperlink control in the grid view control, and the default look of the hyper link control look very bad as I have change the look of the grid view control. Now I have decided to share my that experience with you and here is my default page. here you can see that hyper link control didn't look nice in the grid view control.

Here is the the output , which I want to achieve, mean no blue color and not underline text of the hyper link. To achieve this there are two ways , One is to format the hyper link control in the grid view, and second one is through Css.


First Way:
In the first way you have to set the hyper link control properties in HyperLinkField tag, I have set the font underline and for color properties of the hyper link field and also the font bold to false. Below is the code for you.


<asp:HyperLinkField DataNavigateUrlFields="DetailURL" DataTextField="OrderDetail" ControlStyle-Font-Underline ="false" ControlStyle-ForeColor="black" ControlStyle-Font-Bold="false" />

Second Way:
Here is the css if you don't want to do the setting of the hyper link field in the html. Here you have to set the font-weight and color and also the text decoration properties of the a tag as we know that grid view control generate html table, So I have used that notation to search the a tag in the table.
table tr td a
{
cursor: hand;
font-size: 8pt;
font-family: Segoe UI;
font-weight: normal;
color:Black;
text-decoration:none;
}
Hope you get some idea from above two ways. Both of the above ways are equal you can use any of the above.You can download the source code from here
All and any comments / bugs / suggestions are welcomed!

Sunday, September 13, 2009

Raising DropDownList SelectedIndexChanged From GridView Control

In this post I will show you how you can use the DropDownList SelectedIndexChanged, when DropDownList is placed inside the grid view control. The main form consist of grid view control. The grid view control consist of order name, current status label which will be update when use select one of the value from the dropdownList control in the grid view control.

Here is the html code which is used to bind the SelectedIndexChanged of the dropdownList with the code behind event handler. And also notice that Autopost back property of the DropDownList is set to true. The DropDownList control is bind to the data source on the grdvCategoryList_RowDataBound event of the grid view control.
<asp:TemplateField HeaderText="Order Status">
<ItemTemplate>
<asp:DropDownList ID="ddlDropDownList" runat="server" CssClass="inputfields" OnSelectedIndexChanged="ddlDropDownList_SelectedIndexChanged" AutoPostBack="true"/>
</ItemTemplate>
</asp:TemplateField>
And Here is the code which is placed in the selectedIndexChanged of the dropDownList control. You can see in this code that fist I have converted the sender to the dropDownList control and then by using that DropwDownList control I have get the row of the grid where the current grid view control is placed. Now You have found the row of the DropDownList control no you can find the other control in that row. Here I have find the label control which will display the current value from the DropDownList.
DropDownList ddlCurrentDropDownList = (DropDownList)sender;
GridViewRow grdrDropDownRow = ((GridViewRow)ddlCurrentDropDownList.Parent.Parent);
Label lblCurrentStatus = (Label)grdrDropDownRow.FindControl("lblOrderStatus");
if (lblCurrentStatus != null)
lblCurrentStatus.Text = ddlCurrentDropDownList.SelectedItem.Text;
You can download the source code from here
All and any comments / bugs / suggestions are welcomed!

Saturday, September 12, 2009

Required Field Validation Using Jquery

In this post I will show you how you can validate the required fields of the form. For this post I have simple asp.net form which has first name, last name, email address , user name and the password field, and also two button controls one for save which is used to check for the required fields and the cancel button. Here is the main form of the source example.

And here is the output of the main form when user click on the save button, as you can see that First name , Email address , login name and password fields are required so the border and the back ground color of these field change to red, to indicate that these fields are required.

Here is my Code which is written on the form and which is used to attached the click event with the button control.In the click event I have called the validation() function which is written on the plug-in.
$(document).ready(function()
{
$("#cmdSave").click(function ()
{
return $('#'+'<%=frmMainForm.ClientID %>').validation();
});
});
And here is my plug-in code which is used to check for the required field in the form. Here in the code I have first search the control which has .reg css class in the form by using the each of the jquery.
var blnIsError = true;
$('.req', this).each(function() {
if ($(this).val()== "")
{
$(this).addClass("ErrorMessage");
$(this)[0].title='Enter required field.';
blnIsError =false;
}
});

$('.req').bind("keyup", function()
{
if($(this).val() !='')
{
$(this).removeClass('ErrorMessage');
$(this)[0].title='';
}
});

return blnIsError;
Then in the function I have check the val() of the current control and if the value of the current control is empty string then add new class of css which has property of the background color and the border of the control to be set to red. After checking for the required field by using the reg css class, then I have bind keyup event to each of the reg control so if user enter the value in the control then the Error message class will be removed from that control.

You can download the source code from here

Note: In order to work with this plug-in you have to add reg. class with the control which are required field.
All and any comments / bugs / suggestions are welcomed!

Thursday, September 3, 2009

Adding and Binding A DropDownList Control In Footer of GridView Control

In this post I will show you how you can add DropDownList control in the grid view footer and also binding DropDownList control to the data source. Let us start with the example code. First you have to add the footer to the grid view control by setting the ShowFooter property to true. Next you have to add the dropDownList control to the footer of the any of the column in the grid view. Here I have added country DropDownList in the footer of the country column in the grid view control, this DropDownList control will contain the names of the countries in the grid view, by selecting the distinct country name from the current pages records. Here is the html code to add the DropDownList control in the footer of the country column in the grid view control.
<asp:TemplateField>
<HeaderTemplate >
<asp:Label ID="lblheader" runat="server" Text='Country'></asp:Label>
</HeaderTemplate>
<ItemTemplate>
<asp:Label ID="txtLabel" runat="server" Text='<%# Bind("Country") %>'></asp:Label>
</ItemTemplate>
<FooterTemplate>
<asp:DropDownList ID="ddlDropDownList" runat ="server" ></asp:DropDownList>
</FooterTemplate>
</asp:TemplateField>
And here is the code for the RowDataBound event of the grid view control, here I have first check for the row type , as I am looking for the footer row of the grid view control, So I check for the row type of footer, if current row is footer row then I will search for the ddlDropDownList control which is the dropDownList control added in the footer of the country column in the grid view control. After the FindControl I have check to see if the DropDownList Control is found or not if true, then I have set the DataSource and the DataTextField of the DropDownList control and then at the end I have call the DataBind of the DropwDownList control.

if (e.Row.RowType == DataControlRowType.Footer)
{
DropDownList ddlDropDownList = (DropDownList)e.Row.FindControl("ddlDropDownList");
if (ddlDropDownList != null)
{
ddlDropDownList.DataSource = dtsCustomer.Tables[1];
ddlDropDownList.DataTextField = "Country";
ddlDropDownList.DataBind();
}
}
Here is the output of the above work, You can see the DropDownList in the footer of the Country column of the grid view control.


You can download the source code from here

Note: In the Source code you can find script of a store procedure which you need to execute in the northwind database, And remember you have to replace the alter keyword with the Create so new store procedure will be created.
All and any comments / bugs / suggestions are welcomed!

Wednesday, September 2, 2009

Default Focused Control Asp.net

When developing the web application it is good idea that when form open then it should be set the focus to the some control. For example if you have user log-in form then it is nice if you set the focus on the user log-in name when form loaded. In this post I will show you the techniques used to set the default focus on control when control is first loaded.

First Way
:
With the release of the ASP.NET 2.0, the problem of making the default focus of the control is much easier with the introduction of the "default button" property of the form. Now you can use the defaultfocus attribute of the form. Here is sample HTML code that contains for the form :

<form defaultfocus="ControlID" runat="server">
With the above html code you can set the default focus control for the form. ASP.NET 2.0 provides three different new solutions if you need to set focus dynamically. At run time you can use Page.SetFocus method with control's ID as a parameter or you can simply call a new control's Focus method. They both do practically the same thing. It is only programmer's choice to choose which method likes more.

Second Way
In the second way of achieving default focus control functionality is the JavaScript way and below is the JavaScript code which is used to set the default focus control for the page. Here I have a simple function named "onBodyLoad" which is used to set the focus on the control when form is loaded.
function onBodyLoad()
{
var txtLoginName=document.getElementById('<%= txtLoginName.ClientID%>');
if(txtLoginName !=null)
txtLoginName.focus();
}
The above function can be called at body load or at the form load event, which is set the focus on the control.

Note :When using the master page in asp.net form, when you add new form in your application and check the option of selecting the master page , the newly added form don't have form or body tag it only contain asp:content control which don't have any onload event like the form and body have, so you can either use Page.SetFocus or control.Focus property.

You can download the source code from here.

Note : The download source only contain the JavaScript function .


All and any comments / bugs / suggestions are welcomed!