Sunday, August 29, 2010

Some Useful Properties of Binding Class

When binding the UI control with the data source the Binding class has some useful properties.In this post we will look at them and use them in sample application. The properties which we are going to discuss in this post are the FallbackValue ,TargetNullValue, and StringFormat. Image 1 shows the output of the example code.
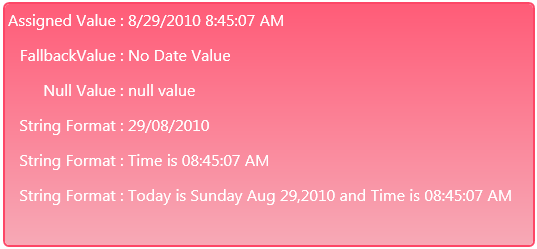
Image 1

Let us discuss each of the property in detail here.

FallbackValue:
                   The first property which we are discussing here is the FallbackValue which is used to Gets or sets the value to use when the binding is unable to return a value.If the path of the property which is bind to the UI control is not found then the DependencyProperty.UnsetValue is returned, then the target property is set to the FallbackValue. if you have set one for the UI element. In Image 1 I have set the FallbackValue for the set statement in the output. The syntax of the setting the FallbackValue is

<TextBlock Text="{Binding UnassignedDateValue,FallbackValue='No Date Value'}" Foreground="White" FontSize="16" FontFamily="Segoe UI"/>

List 1
In the above statement I have remove the grid column and row and also the vertical and horizontal alignment of the text block control. In my case I have not such property with the name UnassignedDateValue in my source so the binding fail and the FallbackValue is displayed as you can see in the Image 1.

TargetNullValue :
                          The second property which is very useful when binding the UI element is the TargetNullValue which is set when the source is null. Tye syntax of  setting the target null value is as given in List 2.

<TextBlock Text="{Binding NullDateValue,TargetNullValue='null Value'}" Foreground="White" FontSize="16" FontFamily="Segoe UI"/>
List 2

Here I have bind the text block text property with the NullDateValue which of nullable DateTime type and I have not set the value of the this, mean default value will be null and the value of the TargetNullValue will be displayed on the screen. This property is very useful when you want to set the null value for a property in code behind now you can set the null value of a property in the UI side.

StringFormat:
                       The third and last useful binding property is the string format property which is very hand if you don't want to set the formatting of the property in code behind. So no need to write the converter for the formatting of the output. Just use the StringFormat property of the binding class.In the List 3, I have used the possible format for the date time, there are scenario when you need to show on the date i.e to show the date of birth, and only the time, and also use the custom format to display string.

<TextBlock Text="{Binding AssignedDateValue,StringFormat='dd/MM/yyyy'}" Foreground="White" FontSize="16" FontFamily="Segoe UI"/> <TextBlock Text="{Binding AssignedDateValue,StringFormat='Time is {0:HH:mm:ss tt}'}" Foreground="White" FontSize="16" FontFamily="Segoe UI"/> <TextBlock Text="{Binding AssignedDateValue,StringFormat='Today is : {0:dddd MMM dd,yyyy} and Time is {0:HH:mm:ss tt}'}" Foreground="White" FontSize="16" FontFamily="Segoe UI"/>
List 3
In the Image 1 last three output statement show the result.In List 3, the first statement is used to display the date part of the dateTime and in the second statement it only show the time part of the date time and then in the last statement , the date and time are shown but with the string value as well for property formatting. Hope you get some idea of these three useful properties, use them in your UI if your bind property have one of above possible value.

All and any comments / bugs / suggestions are welcomed!


Saturday, August 28, 2010

Reading Harddisk Information Using Silverlight 4 Out Of Browser Application

To read the hard disk information in silverlight was my question which I have search on net and was keen to do that, because I want to learn the silverlight. So after search on internet and searching the msdn for this question here is what I have found. You can see the out of the sample code in the Image 1, Here in the Image 1 I have display the hard disk partition just like the window 7 , the title , the progress bar to indicate the usage of the partition space and the at the end the summary of the the partition size.

Image 1

Now let us start with the code sample. First you have to create silverlight out of browser application for this you can click here to read how to create an out of browser application. From the link you can learn how to create an out of browser application in detail.Below is my code which is used to get the drive information. Here you can see that I have called the AutomationFactory.CreateObject, and passing the progID to the CreateObject.The AutomationFactory Provides access to registered Automation servers.Automation is a Windows-based technology that applications use to expose functionality to scripting tools and other applications. For example, you can use Automation to add Office features to your Silverlight-based applications.
An application or component exposing functionality is called an Automation server; an application accessing the functionality is called an Automation client. Because Automation servers must be preinstalled and run in full trust, Silverlight enables only trusted applications to serve as Automation clients.

dynamic fileSystem = AutomationFactory.CreateObject("Scripting.FileSystemObject"); dynamic drives = fileSystem.Drives; DriveInformationCollection = new List&lg;DriveInformation>(); foreach (var drive in drives) { try { if (drive.IsReady) DriveInformationCollection.Add(new DriveInformation { VolumeName = drive.VolumeName, DriveLetter = drive.DriveLetter, TotalSpace = drive.TotalSize, FreeSpace = drive.FreeSpace, FileSystem = drive.FileSystem, DriveType = (eDriveType)Enum.ToObject(typeof(eDriveType), drive.DriveType) }); } catch (COMException Ex) { string strMessage = Ex.Message; } }

Now we have the reference of the automation server which is store in fileSystem of type dynamic.Dynamic is a new type provided by framework 4, you can get more information about the dynamic type by clicking here. Next I have call the drives object of the fileSystem to store the drive in new dynamic object. And then I have used to foreach loop to get the drive information to be store in the class which I have created with the name DriveInformation name.The Drive object allows you to gain information about the various drives attached to a system, either physically or over a network. Its properties allow you to obtain information about:
  • The total size of the drive in bytes (TotalSize property)
  • How much space is available on the drive in bytes (AvailableSpace or FreeSpace properties)
  • What letter is assigned to the drive (DriveLetter property)
  • What type of drive it is, such as removable, fixed, network, CD-ROM, or RAM disk (DriveType property)
  • The drive's serial number (SerialNumber property)
  • The type of file system the drive uses, such as FAT, FAT32, NTFS, and so forth (FileSystem property)
  • Whether a drive is available for use (IsReady property)
  • The name of the share and/or volume (ShareName and VolumeName properties)
  • The path or root folder of the drive (Path and RootFolder properties)
In the view of the form. I have used the list box control to display the drive information , which consist of the text block and the progress bar control.For progress bar control I have added two ChangePropertyAction which you can here for more detail. The condition for first ChangePropertyAction is to check the value of the progress bar if the value is greater then or equal to 80 then the progress bar will be shown red and if the value of the progress bar is less then 80 then progress bar will be shown normally. And the bottom of the user control I have used the grid layout control, the data context of the grid control is set to the selected Item of the list box control. When the selection of the list box changed the correspondent detail of the selected item will be displayed at the bottom of the user control.You can download the source code from here

References 

1- Automation Class
2- Working with Drives and Folders


All and any comments / bugs / suggestions are welcomed!