Showing posts with label Javascript. Show all posts

Saturday, February 4, 2012

Delete Record Using oData Call

Problem:
              Need to delete record from Microsoft CRM 2011 by using the oData call in Microsoft CRM 2011.

Solution:
             The solution to delete record using oData call is similar to the what we have done in my last post "Update Record Using oData Call" where we use the current record Id to update the record here we use same code but with some modification to delete the current record. You can see the code in the List 1 , here you can see similar code which I have used for update of record in "Update Record Using oData Call" post with some modification. First I have only passed the record Id which is used for the delete purpose. Second is the X-HTTP-Method here I have passed DELETE as I am performing the delete operation for the passed GUID.

List 1

And the last modification in the code is the send method of the XMLHttpRequest, here I didn't pass any parameter.On successful deletion of the record it will return status of the 204 or 1223 same as used for the update. Above is the sample piece of code which is used to delete the record by using oData call.

All and any comments / bugs / suggestions are welcomed!

Friday, February 3, 2012

Update Record Using oData Call

Problem:
              Need to update existing record from the JavaScript by using the oData call in Microsoft CRM 2011.

Solution:
             For updating the existing record I have used the same record which I have created in my last post "Insert New Record In Micosoft CRM 2011 Using oData Call ", where I have created new record by using odata call in JavaScript. You can see in the Image 1, here you can see that I have highlighted the Main Phone and the address : City , mean I am going to update these fields Main Phone and the address of the account is going to update using the code here.

Image 1
Code for updating record using oData call in JavaScript is listed in List 1 here you can see that I have first created object for updating the account record then I have used the Address1 to update the City, Line1, Postal code and State or Province of the address and then at the end I have used the Main Phone to be updated.
List 1

After creating the account object for update, next is to create the request object for the oData call, here I have created updateAccountRequest which is used to update the account record. Next is open function of the request which take "POST" as first argument as we are posting data to the server and in the next parameter for the URL note that here we have to pass the Id of the record which is going to be updated by this call. The statement which need to be noted is listed in the List 2 here you can see that in case of update we need to use this extra statement so that record will be updated. For X-HTTP-Method you can refer to the following link Here you can find detail of X-HTTP-Method. We have use the marge request which updates only the properties indicated in the request body, and leaves untouched anything not mentioned in its current state.

List 2

Next is the send function of the HttpRequest to send the updated object and also attached the callback function with the request object.  Here you can see that I have passed record Id to the callback function so that if record is updated successfully then Id will be shown to the client with message and one thing that you can also pass parameter to the completed or callback function which is attached with the request object, mean if you want to send some information which you need in the callback function.
In the callback function I just check the status of the the request for 204 and 1223 as it is the update option and it will return different status. In case of successful it will display message to the client and the if you refresh the active account then you can see the Main Phone and the Address1 : City are update for the record you can see in the Image 2 as below.

Image 2
This is how you can use the oData call to update the record by using JavaScript. I have used simple attribute to update on load of the form you can use this technique.
 
All and any comments / bugs / suggestions are welcomed!

Thursday, February 2, 2012

DateTime Format While Retrieving Using oData

Problem:
            While retrieving date attribute using oData call, the format of date is not correct , need to format data value so that it can be user friendly. As you can see in the Image 1.

Image 1
Solution:
            The solution of the above problem is listed in List 1. Here you can see that I have taken this code from my post "Insert New Record In Micosoft CRM 2011 Using oData Call ", where I have show you how to insert new record by using oData call and you can see in Image 2 of the last post date is not correctly formatted. Here in the code I have modified the completed callback of the Account create async call of my post "Insert New Record In Micosoft CRM 2011 Using oData Call .


List 1

You can see in above code that I have first store CreatedOn value in the stringDataValue object by using eval and converting to string so that I can perform string function on that. In the next statement I have used the Date constructor to create the date, In the Data constructor I have used the parseInt function of JavaScript to parse the value which is return by using the replace function of the string, then I have replace the unwanted characters from the data value like "/Data(" and ")/" so that I have the exact integer value of the date.You can see the output of the result in Image 2


That is how you can format the date when you use the odata call to get the date attribute of the entity. As you can see that the output also show you the time zone as well here it will show +5 for my time zone you can use this as well if you have different time value to shown based on your requirements.  

All and any comments / bugs / suggestions are welcomed!

Wednesday, February 1, 2012

Insert New Record In Micosoft CRM 2011 Using oData Call

Problem:
              Need to insert new record from the JavaScript by using the oData call in Microsoft CRM 2011.
Solution:
              The solution of the above problem is very simple and you can find the solution in the Microsoft CRM 2011 SDK as well. In Microsoft CRM 2011 SDK you can find separate file which contain all the function like Create, Update  and delete record using oData which you can reuse. But in this post I will use oData call without using the help JavaScript file. The JavaScript code is listed in the List 1. In the code you can see that I have created addAccountRecord object and then assigned appropriate value to some of the property of the object.

Note: You can use the Schema Name of the attribute as you can see in the Image 1, here you can see that PrimaryContactId is used to set the Primary Contact of the account.

Image 1

Similarly I have other attribute of the account entity like Name, Description, Revenue , DoNotPhone etc, you can use the name from the schema name from the attribute list of the entity. In the JavaScript code listed in List 1 you can see that Name and the Description attribute are of type Text mean you can assign simple string value to these two attribute.
The PrimaryContactId which is lookup type of contact entity , you have to provide the object which has the Id of the contact , LogicalName of the entity which in this case will be the contact entity and the name of the contact which "Susan Burk (Sample)" in this case. So in order to set the value for a lookup field of the account you have to provide Id , logical name and name.Here I have get the Id of the contact by using the developer toolbar to inspect the HTML of the active account grid so that I can assign value to the lookup field you may use different technique to get the Id and name of the contact.
Next is how to set the value to the picklist and the currency. If you have created plugin then you have idea how to set the value to the picklist and the currency attribute. You need to set the Value of the picklist and currency type and here in the code you can see that I have used that value to set the value to of picklist and the currency type. Last is how to set the value of the boolean type it is just simple either set true of false the only value for the boolean type.
List 1

Next point which I would like to mention here is the how the XMLHttpRequest object is open as I am sending data to the server mean to submit in the sever to I will use "POST", here you can notice that if we need to get data from the server we use "GET" but as you know we are inserting record in the database so we use "POST". Next is the URL which is appended with the "AccountSet" which is the name of the entity "Account". Last parameter for the open function is the boolean value to indicate whether we are making async or sync call by passing true we indicate that we are making async call if you pass false then call weill be sync.
In XMLHttpRequest object send function we pass the object by calling JSON.stringify function which is use to converting JavaScript data structures into JSON text. In the "onAccountCreateCallBack" event handler we check for the readyState of the passed object and status of the object. Here you can see that in this case it will return 201 if record is inserted successfully in the database.
Image2

It will return whole record of the account which is just added in the database. I have only used the Name and the Creation date to be shown that record is added in the database. As you can see in the above image Image 2. You can see the newly added record in the active account view which is shown in the Image 3 as below.
Image3
You just need one extra resource JSON2 which you can get from here. Just add the JSON2 as web resource and add that web resource in the form reference so that it can be accessible when you refere it. Just click the "From properties" by opening the form from customization and you will see the dialog as shown in the Image 4 and here you have to add the JSON2 web resource to access in the form.
Image 4

Hope you get some idea of how to add the record using JavaScript and odata call. I have call above JavaScript on load of form so that when form is loaded new record will be created and alert will be shown which display name of the account and created time of the record.
All and any comments / bugs / suggestions are welcomed!

Monday, January 2, 2012

Checking Existing Value for a Field using OData

Problem:
               We need to check the existing value of the MS CRM 2011 form. Mean we need to prevent the duplicate value of the Account form "Account Number" field and we need to check the value of the "Account Number" when user press save button, check the value in the database and then based on the return value we show message to use and prevent close of form.
Solution:
               We need to check the existing value of the MS CRM 2011 form. Mean we need to prevent the duplicate value of the Account form "Account Number" field and we need to check the value of the "Account Number" when user press save button, check the value in the database and then based on the return value we show message to use and prevent close of form.
JavaScript which is used for the above problem as mention in the Problem section is shown in List 1 here you can see that I have created simple function with name "checkAccountNumber" which is used to check the account number of the account, when you create online Organization which is of trial period of 30 days then you can see that Account number is the field which is already added mean you don't need to add any custom field. In the start of the function is the first statement is used to get the Id of the current record so that I can check if record is used for update then we need to exclude the current record from the search if I don't then it will always return record if we don't change the Account number when updating the account record. Next is the If condition to check the value of the current record if value is not null then add the and (as this will be second condition in the search as the Account number condition will be the first condition)  and then AccountId (primary id of the account) with ne (not equal ) operator. If the account id is null then "accoundIdCondition" will be empty string and we will search with the account condition only.
List 1

The next important thing in the code which I like to explain is the accountNumberRequest.open() the third parameter which is false is used to determine whether call is async o sync as we need to send  sync call because if we send async then when the completed event of the form called the form will be closed. So we will pass false in the third parameter sot that call be will sync and depending on the return value we will prevent the form from closing and saving record. In the getAccountNumberCallBack function I just check for the record and then show message to the end user and then call the preventDetault() function which is used to Cancels the save operation, but all remaining handlers for the event will still be executed.

Image 1
The output of the above function when you execute is shown in the Image 1.Here you can see that I have enter account number which already exist in the database.If it is not in the database then it will not close the form and the form will save the record.


All and any comments / bugs / suggestions are welcomed!

Monday, December 5, 2011

Add/Remove OptionSet Value at Run time Microsoft Crm 2011

Problem:
           In my post "Loop through OptionSet Using Javascript in Microsoft CRM 2011" regarding how to read all the values in the optionSet of the Microsoft Crm 2011 one of the read post question "Would you know how to remove an option from the list getOptions(), because I want the picklist to show only what needed". So in this post I will give you idea how to add remove optionSet using JavaScript.

Solution:
            For the test code I have used the account entity and from account entity I have choose "Preferred Day" and  "Preferred Time" attributes because these attribute are already added when you create only organization which for trial for 30 day. You can see the selected attributes in the Image 1.

Image 1
JavaScript code is listed in the List 1 here you can see first I have get the selected text of the Preferred Day attribute by using getText and store it in the variable which will then used in the comparison. Then in the next line  I have get the Preferred Time option set control and store it in the variable and then by using that variable get all the optionSet of the Proffered Time optionSet and store it in another variable with name "optionSets". Next I have called clearOptions function to remove all the options from the Preferred time Option set.
List 1

Next is the simple check of the Preferred Day text which user selected. I have set First option which is the Morning for the Monday , Afternoon for the Tuesday and Evening for the Wednesday , All option for the Thursday and first two option for the Friday. Here are some of the screen shots when user click the Monday there are only two option one is the empty and second is the Morning as you can see in the Image 2.
Image 2
And in Image 3 you can see the all option when user select Thursday from the Preferred Day option set.
Image 3
In above JavaScript code I have just use the addOption to add option in the option set which take the option set and the location where to add the option set in the OptionSet dropdown.
 
All and any comments / bugs / suggestions are welcomed!

Sunday, December 4, 2011

Communication Between Silverlight And JavaScript (Part 2)

This post is the second part of the series of Communication Between Silverlight And JavaScript. In the First part I have discuss how to call JavaScript from the managed code.Now in this post I will discuss how to call the managed code from the JavaScript.

Calling Managed Code From JavaScript :
                                                                  In order to access managed code from the JavaScript you have to do following steps.

Step 1:
          In step 1 what you have to make is the to create function (which I want to access from the JavaScript). You can do this by using ScriptableMember . So here in List 1 you can see that I have ReceiveMessageFromJavaScript function which is mark as ScripableMember. This function will called from the JavaScript and this function will take just one parameter which is of type string ( which is used to display the current time) and that string parameter is assigned to the Text proerty of the textblock which is used to show the current time on the form.
List 1

Step 2:
          In step 2 what you have to do is to registers a managed object for scriptable access by JavaScript code. As you can see in the List 1 I have used HtmlPage.RegisterScriptableObject function is used to register managed object to be access from the JavaScript. First argument is the key which is used to access the function from the JavaScript here I have used "PageName" as key and second argument is the instance name which I have pass "this".  

Step 3: 
          If you complete Step 1 and Step 2 then managed code is ready to be access from the client side mean from JavaScript. Now we have to make some changes so that we can access the managed code from JavaScript. Now is the next what you have to do is to set the id of the object which has the silverlight application as you can see in the Image 1 here I have set "silverlightApplication" id to the object which is placed inside the div tag with id "silverlightControlHost".

Image 1
The callManagdCode function is simple function which is used to set the current time as string and then pass to the managed code. Let me discuss the important code from the callManagedCode function which is started from where I get the silverlight object by using the "silverlightApplication" id and which is store in the control variable after accessing the "silverlightApplication" control by using document.getElementById next is to call the function from the managed code.
List 2

To call the managed code what you have to do is to used the control which I have store in the control variable and then use the Content and then the key name which I have set in the Step 2 and then the function name which I have set in the Step 1. As you can see in the Image 2

Image 2
At the end of the callManagedCode function I have used the setTimeOut to call the "callManagedCode()" function after every 1 second as my clock display second as well in the time so clock will be updated(if the blnStartClock is true then it will called itself after every second and update the time on the form by calling the managed code).
This how you can call the managed code from the JavaScript. I have tried my best to give full detail of how to make the communication between Silverlight and JavaScript. Hope you get idea of how to call managed code from the JavaScript.You can download the source code from here.

You can read the first part of this series from here where I have discuss how to call the JavaScript from the managed code.

All and any comments / bugs / suggestions are welcomed!

Friday, December 2, 2011

Communication Between Silverlight And JavaScript

Problem:
           While developing silverlight application there are some situation when you need to pass some information from silverlight application (which you can say managed code) to the JavaScript and also from JavaScript to silverlight application (which you can say calling managed code from the JavaScript). So in this post I will discuss how you can communicate between JavaScript and silverlight  application and vice verse.
Solution:
               I have develop simple application which display current time on the screen which you can see in the Image 1 here you can see that see I have one button which is used to start the clock and also to stop the clock. The text of  the button is changed which will return from the JavaScript function if clock is started then its text will be "Stop Clock" and if clock is stopped then button text will be "Start Clock". On button click I call JavaScript which is used to set value of the Boolean variable in JavaScript either true or false and call the function which then call managed code to display the current time on the form.
Image 1

Calling JavaScript From Managed Code:
                                                                 First I will discuss how to call JavaScript from the managed code then I will discuss how to call the Managed code from the JavaScript. First you can see the JavaScript listed in List 1 Here you can see that I have simple JavaScript function which is used to set the inverse of the blnStartClock to blnStartClock which is define globally in the JavaScript sot that other function which is the callManagedCode can used it if the value of the blnStartClock is true. Then is the value which is to set the text of the button control depending of the value of the blnStartClock mean if the it has value true then return "Stop Clock" and if the value is false then "Start Clock" string is return from the function. Which is then use to set the content property of the button control.

List 1

In the List 1 you have seen the simple of the JavaScript function which I will call from the managed code. In list 2 you can see the managed code which is used to call the JavaScript function. Here you can see that I have used HtmlPage.Window.Invoke to call the JavaScript function which you can found in System.Windows.Browser namespace (mean if System.Windows.Browser is not included in your project in the reference then you have to add it in your project).
List 2

In the list 2 you have seen that I have converted the return value from the JavaScript to string as I am return string value which is then use to set the content property of the button control. Here you can see that I have used the sender of the event as I didn't set any name to the button control. When you click the button control you will see the text on the button will changed from "Start Clock" to "Stop Clock" and from "Stop Clock" to "Start Clock". This is the simple way to call JavaScript from managed code.
In this post you have learned how to call JavaScript from managed code and also how to use the return value of the JavaScript function. In next post I will discuss how to call the managed code from the JavaScript.
You can read the second part of "Communication Between Silverlight and JavaSript" from here where I have discuss how to call the managed code from the JavaScript.

All and any comments / bugs / suggestions are welcomed!

Sunday, June 12, 2011

Retrieve rows in crm2011 subgrid with JScript

When I saw account entity I saw a grid which show related contact of the account entity then I think of reading the contact grid in JavaScript. After some search on google I found thread on stackoverflow Which has same question as in my mind and there as solution to that question as well posted.

List 1

I have modified the code posted on that question and modified code is listed in the List 1. Here you can see that element is search by id and I have provided name of the grid which is accountContactsGrid grid. The getRecordsFromInnerGrid function of the gridControl return the number of rows in the grid. The reason of getting the each row fourth column is shown below in the Image 1 as you can see that the fourth column has the detail of the cell in the row.

Image 1

In the inner loop I loop through each cell of the row and display outerText, the first two cell has empty string in the outerText as one is the checkBox cell and second one is the image cell. The name of the grid which I am using is taken from the dialog which is shown below in Image 2.


Image 2

All and any comments / bugs / suggestions are welcomed !

Saturday, June 11, 2011

Tab Properties Using JavaScript in MS CRM 2011

In this post I will show you some of the properties of the tab control. The JavaScript code is listed in List 1. Here you can see that I have set the name of the function loopThroughAllTab which you can call from anywhere. In the function I have used the Xrm.Page.ui.tabs.get() function which will return all the tabs on the page and I have store the list in the tabList. The getName will return the name of the tab control like general, details etc on the account entity. and the getLabel will return the label which is shown on the account entity like General, Details etc.Some times you need to compare the name or the display name to search for specific tab control.

List 1

The getDisplayState return expanded or collapsed value, depending on the setting of the tab control on the tab property dialog. It also has the counter set function which will be used to set the DisplayState of the tab control. And Last function is the getVisible which return either true or false depending on the visibility of the tab control.
Image 1
In Image 1 I have shown what function will return what on the tab properties dialog.

All and any comments / bugs / suggestions are welcomed !

Friday, June 10, 2011

Loop through OptionSet Using Javascript in Microsoft CRM 2011

In this short post I will show you how to loop through the optionSet option in Microsoft Crm 2011 in JavaScript. some time you need to check specific text or value in the optionSet and then enable/ disabled or show hide some of the control on the form.


List 1

In the code above listed in List 1 I have used the OptionSetControl.getOptions() function to get all the optionSet options and then use the lenght property which return the number of options in the optionSet. In for loop I have used the alert to show the option text and value.

All and any comments / bugs / suggestions are welcomed !

Thursday, June 9, 2011

CRM 2011 – Using Javascript to identifying Form context for the record

There are often situations when as a developer you need to check the form whether form is open for create new record or is open for update record. This can be very useful to check whether form is open for create which case need to assign some default values to the some of the controls on the form.JavaScript code is listed in List 1 here you can see that form can be open for six different context including the create and update context.

List 1
In the code above you can see that Xrm.Page.ui.getFormType() is used to get the context of the form. It will return the value of type number which will then check as I have do in switch statement to do appropriate action depending on the context in which form has opened.

All and any comments / bugs / suggestions are welcomed !

Wednesday, June 8, 2011

How to retrieve the Owner values in CRM 2011 Using JavaScript

In this short post I will show you how to get the values of the ownerid in Microsoft Dyanimics Crm 2011. You can see the code is listed in the List 1. Here you can see that I have get the id of the owner and name of the owner type and typename and also entityname.


List 1

You can see that I have get the 0 index value of the owner. Here  I have display the id, entitytype,  name , type and typename of the ownerid. id will be the GUID of the owner and name will be the full name of the owner.


All and any comments / bugs / suggestions are welcomed !

Sunday, June 5, 2011

How to retrieve the optionset text and value in CRM 2011

In this post I will show you how to get the selected text and value from the optionSet using javascript in Microsoft Dynamics Crm 2011

List 1


In the code listed in the List 1 you can see that I have used two option to get the selected value of the option set. By using getSelectedOption function which has the text and the value properties and second option is getText() and getValue() function which also return same values. The output of the getSelectedOption() function can be seen in the Image 1. I have display the values using watch here you can see that It has only two properties one is text and second one is value which is number type.
Image 1

The output of the getText() and getValue() can be see in the Image 2. Here you can see same values are displayed which are shown in the Image 1  Text is string type and value is Number type which you can see in the Image 2.

Image 2


All and any comments / bugs / suggestions are welcomed !

Monday, May 9, 2011

Selected Specific Columns when Using OData using JSON In Microsoft CRM 2011

In this post I will show you about getting the required columns of the two entities which are fetch in one json request. For this example what I want to achieved is to get full name, first name , last name and the title of the system user and then from system user role I want to fetch the roles of the user which are associated with the system users. The Javascript code is listed in the List 1 as you can see in below. Here you can see code is simple the only thing which need some discussion here is the formation of the serverURL.


List 1

In the serverURL I have used the $expand keyword with the systemuserroles_association entity the $expand is query string options defined in the OData protocol that are implemented in the REST endpoint for Microsoft Dynamics CRM.The $expand
Directs that related records should be retrieved in the record or collection being retrieved. for example, to retrieve opportunity records related to accounts, use the opportunity_customer_accounts entity relationship. The query like /AccountSet?$expand=opportunity_customer_accounts returns the opportunity records and the account records.
Note: By default maixmum six relationships can be expanded.
Next I have to get the Full name , first name, last name and title for the system user and only the name of the roles which are assigned to the user. For that I have use the $select which is one of the query string options defined in the OData protocol which Specifies a subset of properties to return and the order in which the columns of data will be organized. The default is to return all columns that corresponds to $select=*.
You can see the order of the columns selection. Here I have used the $select and then first I have selected the column name for the systemuser pluse the systemuserroles_association entity name and the forward slash (/) and the column name of the systemuserroles_association which in this case is the name as I want to retrieve the name of the role(s) which are assigned to the user.
Image 1

In the retrieveSystemUserCallBack function I have parse the result using Json.parse and assign the .d property to the new variable. Then in the next statement I have used 2 loops to read the roles of the user as the system user roles filled in the collection with the name systemuserroles_association which you can see in the Image 1. You can see the whole structure of the one record which is shown in the Image 1.

All and any comments / bugs / suggestions are welcomed !

Thursday, May 5, 2011

Using JSON to retreive Data IN Microsoft CRM 2011

Ajax is always one of my favorite area of working for fetching and saving data in the database.It allows me to connect to server by staying on the client machine and the send request and after successfully return data from the server end working on the data to display on the user screen. In this post I will show you how to get the all the user using JSON in Microsoft CRM 2011. Let us start with our javascript code to fetch the information of the system user. JavaScript code for to fetch the system user information is listed in List 1. Here you can see that I have declare serverURL first in the beginning of the GetUserInformation function and assign it the value by concatenating the value of the getServerUrl which return the base server URL and then the end point of the service which in this case is the OrganizationData.svc. At the end of the serverURL you can see the name of the entity which is used to fetch the record here I have used the SystemUserSet. Each Microsoft Dynamics CRM entity is represented in the conceptual schema definition language (CSDL) as a collection using the element. The name of each collection follows the naming convention of [Entity Schema Name]+ Set. This name is used in the URL to access a collection of entity records


List 1
If you want to do operation such as retrieve , delete, insert and update on the account entity then you use the name AccountSet and same for the other entities as well. After setting the serverURL in the next statement I have created XMLHttpRequest object with the name getSystemUser and then set the properties of the getSystemUser object.
In the open function of the getSystemUser object I have passed the type which is either GET or POST as I am retrieving data so my request will be GET and the URL of the server which I have store in the serverURL which is either a relative or absolute URL may be used here. If an absolute URL is being used, most browsers implement a same-origin policy, meaning the URL being requested must be on the same domain as the domain from which the URL is being requested. and last parameter is for how request should be issued: True for asynchronous; False for synchronous.
In the next statement I have set the Header of the getSystemuser object and set the return type to json. and then set the onreadystatechange event for the asynchronous operation and then send the request by passing the null object.

Image 1

In the retrieveSystemUserCallBack function first is to check the readystate of the request which is the 4 for complete and then check for the status of the request which is 200 for successfully return of the request. Then in the next statement JSON.parse will be use which is used to Deserializes JavaScript Object Notation (JSON) text to produce a JavaScript value. JSON.parse is defined in Json2 which you can download from here. I have added the Json2.js file as web resource in the Microsoft CRM 2011. For those who don't have idea of how to add web resource and use them in the Microsoft CRM 2011 see the post by Ayaz Ahmed.  As we have specify that return value will be Json the results will be in the d property of the data object returned. When you are creating a record or retrieving a single record using the unique identifier, d will represent the data for the record. In every other case d will be an array. As you can see in the List 1 that after the Json.parse I have used the d property to get the value which is store in the retrievedUsers object.
At the end I have loop throught the retrievedUser collection and shown the full name of the user.The output of the request can be seen in the Image 1 which is displayed using the Json Viewer which is used to show the Json data in tree format. Hope you get idea of how to use the Json in OData to retrieved data using Microsoft CRM 2011.

All and any comments / bugs / suggestions are welcomed !

Wednesday, April 20, 2011

Disable Field In Microsoft CRM 2011

As I have shifted to Microsoft CRM 2011 due to change of my job. Now I will give you some tips regarding MS CRM 2011 from here onword and also Silverlight as well because of the nature of the job. Here is my first post regarding MS CRM 2011 which is how to disabled field on the form using javascript. The code is listed below

List 1
In the List 1 you can see I have define a javascript function which will take two parameter with the name of pickListName and the fieldName. picklistName is the name of the picklist which is used to enabled disabled the field. I have 2 values in the pickList based on the selected value I have endabled disabled the field on the form. First I have check for the null value as I have added empty string in the picklist for no selection.

All and any comments / bugs / suggestions are welcomed!

Sunday, April 4, 2010

Google Map For Beginners

I was just working understand how the Google maps work and how developer use the Google maps in there web site. Now I have created a sample page for the Google map and I would like to share this example with you so that you can also get starting point of the Google maps.Below is the image of the example. Here you can see that I have Google map and one table below the Google map( will describe later).

Image 1
And here is the what I want to achieve , I want to get all possible result when user click on particular on the Google maps and that result should be displayed in table like format.

Image 2

In order to get started with Google what you have to do is to get a Google map key, the Google map key is important if you want to place you project live, if you used it locally on your PC then you don't need any Google Key.To get Google map key you can go here to get the Google map key. From there what you have to do is to give the URL of your web site. For example my blog URL is http://asimsajjad.blogspot.com, So I have to put this URL in "My web site URL" input box and accept the terms and click the Generate Key button. In the next page you have four ways to include Google map key in your project, first one is simple key, second one is the Script tag that include key, maps API for flash and HTTP Service example. for you if you need to used it in the web project you go for second option "JavaScript Maps API Example".

< script src="http://maps.google.com/maps?file=api&v=2&sensor=false&key=ABQIAAAA8RrNA2ad3sXGIzKjA4Rq5hSMhSD8o7XRZ8sp4sebDRHHwO96tRQCUNJChXwnEcob6qAGQYpm4rNG6Q"
type="text/javascript"> < /script>

Use of the Google Maps API now requires that you indicate whether your application is using a sensor (such as a GPS locator) to determine the user's location. This is especially important for mobile devices. Applications must pass a required sensor parameter to the <script > tag when including the Maps API javascript code, indicating whether or not your application is using a sensor device.Applications that determine the user's location via a sensor must pass&sensor=true when loading the Maps API JavaScript via either the http://maps.google.com/maps or with the Common Loader.

Note: As in my case I have give base URL of my blog, Now I can use this key for multiple pages on my blog if you want to generate key per page then you have to give complete URL including page name in the "My web site URL", But it is best to have same key for all the pages in the web site.

Next you have to put below tag in the body of the form and note that the id of the div tag. As this id is used to load the Google map, and will be passed to the GMap2 constructor.
< div id="map_canvas" style="width: 800px; height: 600px; border: 0px solid #466094;background-color: #EEF0F6;">
< /div>
Below is the my code which is used to initialize the object and load the Google map , and the initialize function is called when the window is loaded.The JavaScript class that represents a map is the GMap2 class. Objects of this class define a single map on a page. When you create a new map instance, you specify a DOM node in the page (usually a div element) as a container for the map. HTML nodes are children of the JavaScript document object, and we obtain a reference to this element via the document.getElementById() method.

var googleMap;
var geocoder;
var address; ;

function initialize() {
if (GBrowserIsCompatible()) {
googleMap = new GMap2(document.getElementById("map_canvas"));
googleMap.setCenter(new GLatLng(53.3042827, -6.2401578), 13);
point = new GLatLng(53.3042827, -6.2401578);
marker = new GMarker(point);
googleMap.addOverlay(marker);
googleMap.setUIToDefault();
geocoder = new GClientGeocoder();
GEvent.addListener(googleMap, "click", function(overlay, latlng) {
address = latlng;
geocoder.getLocations(latlng, showAddress);
});
}
}
Once you have created a map via the GMap2 constructor, we need to initialize it. This initialization is accomplished with use of the map's setCenter() method. The setCenter() method requires a GLatLng coordinate and a zoom level and this method must be sent before any other operations are performed on the map, including setting any other attributes of the map itself. Additionally, we also call setUIToDefault() on the map. This method sets up the map's user interface (input handling and set of controls) to a default configuration, including pan and zoom controls, selection of map types, etc. See Using the Default Maps UI in the Controls chapter for more information.
I have also declare the variable of geocoder name which is used for the reverse coding.The term geocoding generally refers to translating a human-readable address into a point on the map. The process of doing the converse, translating a point into a human-readable address, is known as reverse geocoding. I have also attached click event with the googleMap object. In the click event of the googleMap object I have used the function of getLocations of geocoder object .The GClientGeocoder.getLocations() method supports both standard and reverse geocoding. If you pass this method a GLatLng object instead of a String address, the geocoder will perform a reverse lookup and return a structured JSON object of the closest addressable location. Note that the closest addressable location may be some distance from the original latitude and longitude values of the query, if the supplied GLatLng is not an exact match for any addressable locations.For the accuracy you can see the following below is the table with the constant value and description.
Constant
Description
0Unknown location
1
Country level accuracy.
2
Region (state, province, prefecture, etc.) level accuracy.
3
Sub-region (county, municipality, etc.) level accuracy.
4
Town (city, village) level accuracy.
5
Post code (zip code) level accuracy.
6
Street level accuracy.
7
Intersection level accuracy.
8
Address level accuracy.
9
Premise (building name, property name, shopping center, etc.) level accuracy.

Hope you can get some starting point of how to use Google map in your applications.Click Here To view online sample.

References:
1- Map Basics
2- Google Maps API Concepts
3- Services

All and any comments / bugs / suggestions are welcomed!

Sunday, July 5, 2009

JavaScript Debugging Techniques in IE 6

Microsoft’s Internet Explorer 6 is almost universally hated by web developers. It’s hard to work with and support, but with a few solid techniques, you can make the process less painful. What “just works” in the majority of browsers will almost always require hours of tweaks and workarounds to get it working in IE6. With more and more users switching over to newer alternatives such as IE8, Safari and Firefox hopefully support for IE6 can be dropped sooner rather than later. In the mean time though many of us have to make sure our sites work in this awful browser.
To make things worse, IE6 is extremely bad at helping developers diagnose problems. When a JavaScript error occurs, IE6’s default behaviour is to display a small error icon in the status bar. Extremely easy to miss!
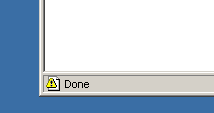

Double clicking on this icon will display a popup, and if you then click the “Show Details” button you’ll get the actual details of the JavaScript error. Unfortunately the detailed error message can be quite cryptic, and probably not too much help in diagnosing the actual problem. Your best bet is to make a note of the line and column number of the problem and then look that up in the source code. Fortunately, with the help of Visual Studio and by changing a few IE settings, we can make it much easier on ourselves.

Setting things up
To enable JavaScript debugging in IE we need to change some default settings, which can be accessed from the Tools> Internet Options menu, and then the Advanced tab. The image below shows the default IE6 settings, with the three settings we’re interested in highlighted.
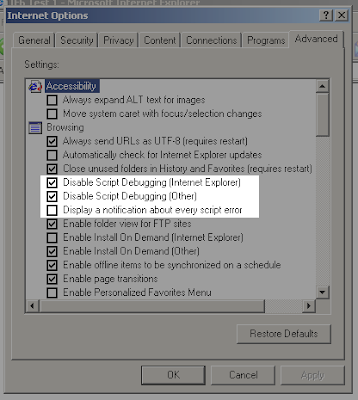

Script debugging in IE needs be enabled, which requires us to disable the first option out of the three. If you also want to debug scripts in other contexts (such as Outlook) then disable the second option. Enable the third option if you’d like the JavaScript error dialog to pop up automatically instead of being displayed as a small icon in the status bar.
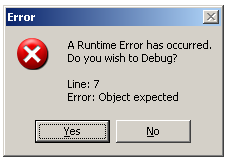


After changing those settings and restarting IE, we’re ready to start debugging. All of the following examples show Visual Studio 2005, but the same applied to 2008. You can also use the free Web Developer Express Edition if you don’t own a full copy of Visual Studio. Instead of IE prompting you to open the debugger, as it does in the examples below, you’ll first need to create a project and then start the debugger yourself. From that point on everything is the same.

Basic debugging
Let’s start with a simple example. The code below tries to call a function that doesn’t exist:
<script type="text/JavaScript">
functionDoesNotExist();
</script>
Now when we load that up into the browser instead of the tiny icon in the status bar IE will prompt us to open a debugger.
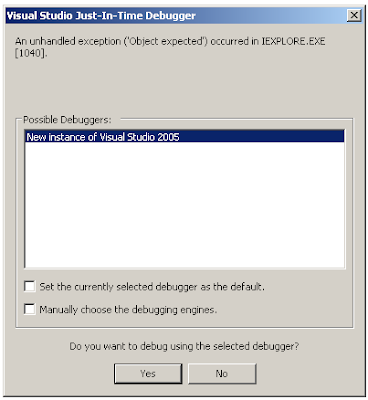

Selecting Visual Studio and clicking the yes button will open Visual Studio and highlight the code that is the cause of the problem.
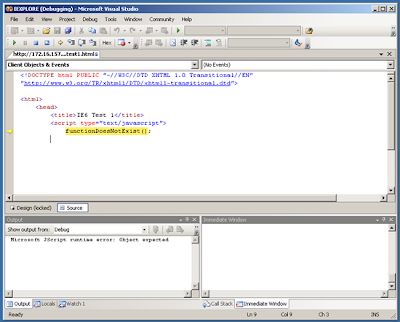

For relatively simple errors, such as the one in the example above, just seeing the actual cause of the error highlighted is probably enough for us to work out what has gone wrong, and how to fix it. In more complex cases, however, we’ll need more information. This where the Visual Studio debugging features come in really handy.
In the code below we have a function, performAction, which takes a function as an argument and calls that function once it’s done. You’ll commonly see this sort of thing in JavaScript with asynchronous functions such as setTimeout and jQuery’s Get. There is a problem with the code below though: We’re accidentally passing in a string to performAction rather than a function.
<script type="text/JavaScript">
/**
* Perform an imaginary action, and then
* call the callback function once we're done
*/
function performAction(callback) {
// Perform an action here
// ...
// We're done, call the callback
callback();
}
// Call performAction with an anonymous
// callback function which contains an error
var myFunc = "this is a string, not a function!";
performAction(myFunc);
</script>

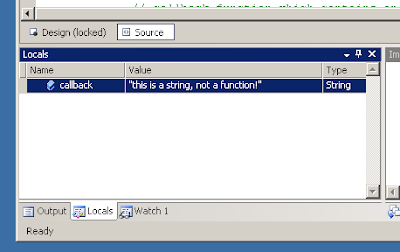
If we load up the code in IE and then debug it in Visual Studio as we have before we’ll see that the code “callback();” is highlighted, and is therefore the cause of problem. It won’t be obvious why this line is causing the problem though, not unless we know what the value of callback is. If callback was actually a function then there wouldn’t be a problem at all. The problem has only arisen because we accidentally passed in a string. This is where the “locals” window comes in handy. It lists all local variables along with their value and type. To display this window go to the Debug menu, then Windows, and then select Locals.
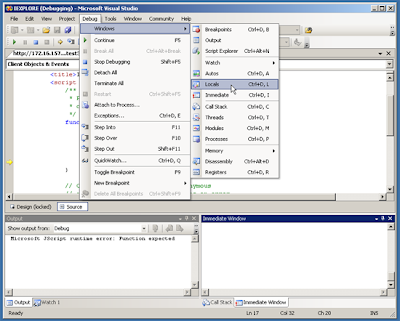
With the locals window displayed it’s clear that the problem is that callback is a string, rather than a function. The locals window doesn’t just support basic types such as integers and strings. If you’ve got a local object you can look at all of its properties and see the value and type of each of them, as we’ll see in the next example.


The ‘debugger’ keyword
The ‘debugger’ keyword, also supported by the Firefox JavaScript debugger Firebug, can really help us to track down problems. Below is a slightly modified version of the previous example, where this time the callback function is passed an object that should include a status and message property. The message property has been misspelled though:
<script type="text/JavaScript">
/**
* Perform an imaginary action, and then
* call the callback function once we're done
*/
function performAction(callback) {
// Perform an action here
// ...

// We're done, call the callback
callback({success: true, mesage: 'The action was performed!'});
}

// Call performAction with an anonymous
// callback function which contains an error
performAction(function(response) {
alert(response.message);
});
</script>

Because ‘message’ has been misspelt as ‘mesage’ in the performAction function when we run this code in IE we’ll see a popup alert with the message “undefined”, rather than the actual message we were hoping to see.
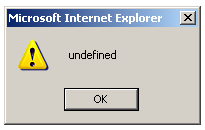
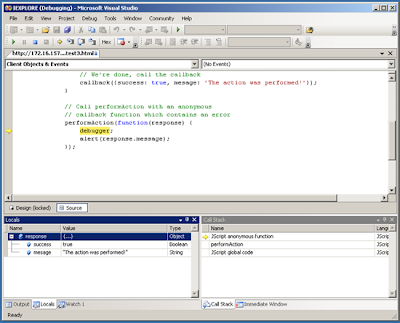
In a large project it can be difficult to track down why a property we expect to exist is undefined. Instead of trawling through lots of code we can simply add the line “debugger;” above the alert statement. IE will then automatically prompt us to debug the code in Visual Studio when it hits that line. From the locals window we can see that the ‘message’ property has been misspelt.

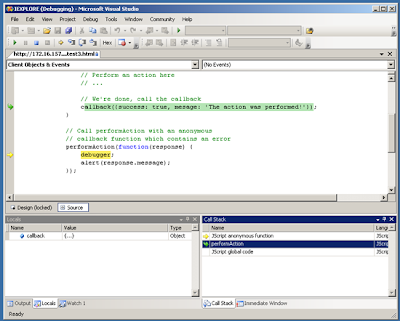
Using the call stack window, which can be accessed in the same way we accessed the locals window, shown at the bottom right of the above screenshot we can work out exactly where this problem occurred. If we double click on the ‘performAction’ line, the previous statement in the call stack, we’ll see the source of the error.
While debugger statements can be a useful tool in helping you track down problems you should be careful not to leave them in your production code!

More advanced debugging
So far we’ve covered some basic examples, such as calling non-existent functions and undefined properties. Using the locals and call stack windows it was relatively straight forward to track these issues down. There are times when the techniques we’ve discussed so far can’t help though. We can’t see what global variables exist or what value they have with the locals window, for example, and the call stack doesn’t always handle remotely loaded or dynamically executed code very well.
For these situations we must turn to the immediate window. It is by far the most powerful debugging tool that Visual Studio has to offer, allowing us to evaluate JavaScript expressions on the fly.The immediate window can be accessed in the same way that we accessed the other windows. Clicking inside the window will give it focus. We can then type JavaScript statements directly into the window and see the result. For example, type “window” followed by enter and you’ll get a print out of everything in the global scope.
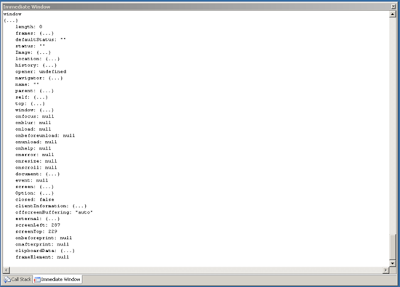
When combined with the JavaScript arguments variable we can look in detail at all the current function arguments and the calling function. While the code in the next example isn’t something you’re likely to see in a real project, it does help to demonstrate techniques that can be extremely useful.

<script type="text/JavaScript">
/**
* This function takes a variable number of arguments.
*/
function performAction() {
// We're just interested in the immediate
// window, start the debugger
debugger;
}

// Call performAction with 4 different arguments, each of a different type
performAction('argument 1', 2, {argument: 3}, function() { return 4; });
</script>
We’ll load this up into IE and then go straight to the immediate window once we’ve opened up the debugger. If we type “arguments” followed by enter we’ll see the following information displayed:

arguments
{...}
[0]: "argument 1"
[1]: 2
[2]: {...}
caller: null
length: 4
The “{…}” tells us that arguments is an object. We also see this next to [2], so we know that the third argument (in array position 2) is an object. We can see what properties this object has by simply typing its name into the window:
arguments[2]
{...}
argument: 3
The fourth argument wasn’t listed in the original output because it’s a function. We know it exists though because the length property tells us that there are 4 arguments. We can also confirm it is there using typeof:
typeof arguments[3]
"function"
Unfortunately the immediate window isn’t quite so helpful with functions as it is objects, and if we type in the name of the function we just see “{…}” rather than any details of the function itself. Fortunately there is a handy workaround. If we type “alert(arguments[3]);” then the function code will be displayed in an alert dialog:
Hopefully these examples have conveyed just how powerful the immediate window is.

Summary
With the help of Visual Studio it is possible to transform IE6 from obscure error messages into an effective debugger. By using the local and call stack windows we can quickly and easily track down the majority of problems. The debugger statement allows us to automatically jump into the debugger at any point in our code. Should we come up again a more complex where the other tools can’t help us then we can always turn to the immediate window, which allows us to execute arbitrary JavaScript to inspect the current environment.


Reference
1) JavaScript Debugging Techniques in IE 6