Sunday, November 15, 2009

Adjusting Client Area on Client End

In this short post I will show you how to fix the client area of the web page. I have worked in desktop application, if some of you work in desktop application then you notice one that form will re size according to the resolution of the screen, So here in this post I will try to adjust the size of the client area so that the scroll on the page is not appear and the scroll in the client area is shown. Let us start our example code. I have main table which consist of three rows one is the header, then body and at the end the footer row. And One grid view control which is used to show records to the user and below is the image and here you can see that the grid view control has adjust the height and the height of the grid view control depends the number of record.


Now what I did is , place a div tag in the body row and set the width and height of the div in the onLoad event of the body tag. Below is the javascript which is used to set the height and the with of the divMain to the 92.5 percent.

var divMain=document.getElementById ("<%=divMain.ClientID %>");
divMain.style.height =document.documentElement.clientHeight*.925;
divMain.style.Width=document.documentElement.clientWidth*.925;

Here is the output after setting the width and height on client side. The above code is working fine in the internet explorer but not in the fire fox.

You can download the source code from here
All and any comments / bugs / suggestions are welcomed!

Saturday, October 31, 2009

Animation of Expander Control in Expand/Collapsed Event

During exploring of the WPF I have work for the expander control when expander control is expanded then apply some sort of animation and when the expander control is Collapsed then same animation is executed in same order. I have successfully applied animation in the expanded event of the expander but couldn't perform any sort of animation when the expander is collapsed. Then I have search on google about the collapsed animation on the expander control and I have find such a nice solution about Collapsed animation and you can says the structure of the expander. Now I will share this work with you, for this example I have expander control and I have used the Expression Dark theme from CodePlex. I have only used the expander control template from the expression Dark theme and remove other control template from the expression dark theme. Here is the expander control when it is expanded.


By Reading the article, I have made the following changes in the expander control template which is found in the expression dark theme. As the ContentPresenter is placed inside the border control so, I have removed the Visible attribute of the border and set the height of the border to 0(zero), Below is the xaml of the border control which is used in the expander template.

<Border Background="{DynamicResource ShadeBrush}" BorderBrush="{DynamicResource NormalBorderBrush}" BorderThickness="1,1,1,1" CornerRadius="3,3,3,3" Margin="1,1,1,1" x:Name="border"/>
Then in the control template trigger remove the blow line of xaml which is used to set the visibility of the border to visible and add the enterAction and the exit action of the trigger which are used to begin two different story boards.
<Trigger Property="IsExpanded" Value="true">
<Setter Property="Visibility" TargetName="border" Value="Visible"/>
</
Trigger>
<Trigger.EnterActions>
<BeginStoryboard Storyboard="{StaticResource strbExpand/>
</Trigger.EnterActions>
<
Trigger.ExitActions>
<BeginStoryboard Storyboard="{StaticResource strbCollapse}"/>
</
Trigger.ExitActions>

And here are the two story boards which are in the control template resource. the strExpand which is used to increase the height of the border and the strbCollapse which is used to decrease the height of the border.

<ControlTemplate.Resources>
<Storyboard x:Key="strbExpand">
<
DoubleAnimationUsingKeyFrames BeginTime="00:00:00" Storyboard.TargetName="ExpandSite" Storyboard.TargetProperty="(FrameworkElement.Height)">
<
SplineDoubleKeyFrame KeyTime="00:00:00" Value="0"/>
<SplineDoubleKeyFrame KeyTime="00:00:00.1200000" Value="100"/>
</
DoubleAnimationUsingKeyFrames>
</Storyboard>
<Storyboard x:Key="strbCollapse">
<DoubleAnimationUsingKeyFrames BeginTime="00:00:00" Storyboard.TargetName="ExpandSite" Storyboard.TargetProperty="(FrameworkElement.Height)">
<SplineDoubleKeyFrame KeyTime="00:00:0" Value="100"/>
<SplineDoubleKeyFrame KeyTime="00:00:00.1200000" Value="0"/>
</
DoubleAnimationUsingKeyFrames>
</Storyboard>
</
ControlTemplate.Resources>
You can download the source code from here
All and any comments / bugs / suggestions are welcomed!


Sunday, October 18, 2009

Color Animation Using Expression Blend

In this post I will show you how you can create color animation using the expression blend. This is also my first time that I have created animation using the expression blend, before this I used to create the animation using the code behind file which is the C#. For your information this is also my first time color animation. So I want to share this with you , how to create the color animation using expression blend.
Let us start with our example I have a simple window Which consist of a border control and I want to change the background color and the border color of the border color to change. Here is the main window of my color animation.


Next I have to add the story board for my color animation. For this you can press F6 to switch between the Animation Workspace and the Design Workspace. Now when you press F6 you will see the Animation workspace and below is the animation workspace. You can add new story board, close and event delete the story board. In the below image you can see all the possible option for the story board creation to delete as well.


Next is I have move the playhead to a location in the timeline where you want a property change to occur. I have move the play head to the .500 where I want the back ground and the border of the border color to be changed. By placing the play head to the .500 I have set the back ground color to the gradient color and the border color to the white. And here the is the look of the border control at time .5000, you can see that I have set the background and the border of the border color.


I have set the repeat behavior of the story board to forever and auto reverse to false. When you press the play button of the story board it will run the you will see the color change form the original set color to the new gradient color. I have also created a busy control for myself and I have share with you, so that if you need it you can use it in your project. The main window contain two button one is for the simple animation and second one is for the busy bar which is useful when you perform work in the background and show this animation to show user that application is performing work in the background. Here is the output of my busy bar window.


You can download the source code from here
All and any comments / bugs / suggestions are welcomed!

Wednesday, September 23, 2009

Inserting Inside Using Jquery

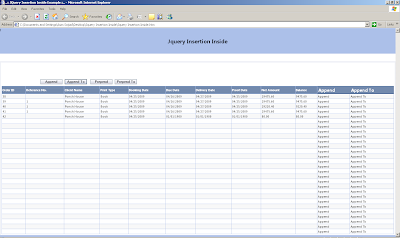
In this Post I will show you how you can insert the new elements at run time in web application, using jquery library. Below is the image of the example source, which consist of table and four button control. Append, Append To, Prepend and Prepend To are used as button.Let us start our example.


1- Append
The first way to add the new element to the exist element is the use of the append function. Below is the code which is execute when user click the append button on the main form. In the click event of the append button I have used the append in the first statement which is used to add the column in the first line and then in the each selector (which is used to add the columns in the remain rows of the table. It will used to insert new column at the end.

$("#btnAppend").click(function()
{
$('#tblMainTable tr:first').append("<td class='TableHeading'>Append</td>");
$('#tblMainTable tr:not(:first)').each(function(){
$(this).append("<td class='tdMiddleCells'>Append</td>");
});
});
Here is the syntax of the append function.
.append(content)
Parameter for the append function is the content, A selector, element, HTML string, or jQuery object to insert at the end of each element in the set of matched elements. It will return jQuery object, for chaining purposes.

2- Append To
The second way to insert the new element is by use of the appendTo function which do the same task as the append function do. The only difference is in the syntax—specifically, in the placement of the content and target. With .append(), the selector expression preceding the method is the container into which the content is inserted. With .appendTo(), on the other hand, the content precedes the method, either as a selector expression or as markup created on the fly, and it is inserted into the target container.
$("#btnAppendTo").click(function()
{
$("<td class='TableHeading'>Append To</td>").appendTo('#tblMainTable tr:first');
$('#tblMainTable tr:not(:first)').each(function(){
$("<td class='TableHeading'>Append To</td>").appendTo(this);
});
});
Here is the syntax of the appendTo function.
.appendTo(target)
Parameter for the appendTo function is the target, A selector, element, HTML string, or jQuery object; the matched set of elements will be inserted at the end of the element(s) specified by this parameter. It will return jQuery object, for chaining purposes. Here is the output of the both append and appendTo calls.


3- Prepend
The third way to insert new element is the use of the prepend function. This operation is the best way to insert elements inside, at the beginning, of all matched elements.
$("#btnPrepend").click(function()
{
$('#tblMainTable tr:first').prepend("<td class='TableHeading'>Prepend</td>");
$('#tblMainTable tr:not(:first)').each(function(){
$(this).appendTo("<td class='TableHeading'>Prepend</td>");
});
});

Here is the syntax of the appendTo function.
.prepend(content)
Inserts content, specified by the parameter, at the beginning of each element in the set of matched elements.Parameter for the prepend function is content, An element, HTML string, or jQuery object to insert at the beginning of each element in the set of matched elements. It will return jQuery object, for chaining purposes.

4- Prepend To
The fouth way to insert the new element is by using of the prependTo function which do the same task as the prepend function do. The only difference is in the syntax—specifically, in the placement of the content and target. With .prepend(), the selector expression preceding the method is the container into which the content is inserted. With .prependTo(), on the other hand, the content precedes the method, either as a selector expression or as markup created on the fly, and it is inserted into the target container.
$("#btnPrependTo").click(function()
{
$("<td class='TableHeading'>Prepend To</td>").prependTo('#tblMainTable tr:first');
$('#tblMainTable tr:not(:first)').each(function(){
$("<td class='TableHeading'>Prepend To To</td>").prependTo(this);
});
});
Here is the syntax of the prependTo function.
.prependTo(target)
Parameter for the prependTo function is the target, A selector, element, HTML string, or jQuery object; the matched set of elements will be inserted at the beginning of the element(s) specified by this parameter. It will return jQuery object, for chaining purposes.
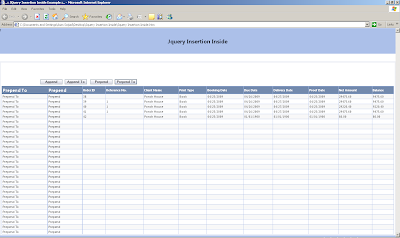
Here is the output of the both the prepend and prependTo calls.


You can download the source code from here
All and any comments / bugs / suggestions are welcomed!

Tuesday, September 15, 2009

Changing Hyperlink Color, Place In GridView Control

I still remember my time when I have used the hyperlink control in the grid view control, and the default look of the hyper link control look very bad as I have change the look of the grid view control. Now I have decided to share my that experience with you and here is my default page. here you can see that hyper link control didn't look nice in the grid view control.

Here is the the output , which I want to achieve, mean no blue color and not underline text of the hyper link. To achieve this there are two ways , One is to format the hyper link control in the grid view, and second one is through Css.


First Way:
In the first way you have to set the hyper link control properties in HyperLinkField tag, I have set the font underline and for color properties of the hyper link field and also the font bold to false. Below is the code for you.


<asp:HyperLinkField DataNavigateUrlFields="DetailURL" DataTextField="OrderDetail" ControlStyle-Font-Underline ="false" ControlStyle-ForeColor="black" ControlStyle-Font-Bold="false" />

Second Way:
Here is the css if you don't want to do the setting of the hyper link field in the html. Here you have to set the font-weight and color and also the text decoration properties of the a tag as we know that grid view control generate html table, So I have used that notation to search the a tag in the table.
table tr td a
{
cursor: hand;
font-size: 8pt;
font-family: Segoe UI;
font-weight: normal;
color:Black;
text-decoration:none;
}
Hope you get some idea from above two ways. Both of the above ways are equal you can use any of the above.You can download the source code from here
All and any comments / bugs / suggestions are welcomed!

Sunday, September 13, 2009

Raising DropDownList SelectedIndexChanged From GridView Control

In this post I will show you how you can use the DropDownList SelectedIndexChanged, when DropDownList is placed inside the grid view control. The main form consist of grid view control. The grid view control consist of order name, current status label which will be update when use select one of the value from the dropdownList control in the grid view control.

Here is the html code which is used to bind the SelectedIndexChanged of the dropdownList with the code behind event handler. And also notice that Autopost back property of the DropDownList is set to true. The DropDownList control is bind to the data source on the grdvCategoryList_RowDataBound event of the grid view control.
<asp:TemplateField HeaderText="Order Status">
<ItemTemplate>
<asp:DropDownList ID="ddlDropDownList" runat="server" CssClass="inputfields" OnSelectedIndexChanged="ddlDropDownList_SelectedIndexChanged" AutoPostBack="true"/>
</ItemTemplate>
</asp:TemplateField>
And Here is the code which is placed in the selectedIndexChanged of the dropDownList control. You can see in this code that fist I have converted the sender to the dropDownList control and then by using that DropwDownList control I have get the row of the grid where the current grid view control is placed. Now You have found the row of the DropDownList control no you can find the other control in that row. Here I have find the label control which will display the current value from the DropDownList.
DropDownList ddlCurrentDropDownList = (DropDownList)sender;
GridViewRow grdrDropDownRow = ((GridViewRow)ddlCurrentDropDownList.Parent.Parent);
Label lblCurrentStatus = (Label)grdrDropDownRow.FindControl("lblOrderStatus");
if (lblCurrentStatus != null)
lblCurrentStatus.Text = ddlCurrentDropDownList.SelectedItem.Text;
You can download the source code from here
All and any comments / bugs / suggestions are welcomed!

Saturday, September 12, 2009

Required Field Validation Using Jquery

In this post I will show you how you can validate the required fields of the form. For this post I have simple asp.net form which has first name, last name, email address , user name and the password field, and also two button controls one for save which is used to check for the required fields and the cancel button. Here is the main form of the source example.

And here is the output of the main form when user click on the save button, as you can see that First name , Email address , login name and password fields are required so the border and the back ground color of these field change to red, to indicate that these fields are required.

Here is my Code which is written on the form and which is used to attached the click event with the button control.In the click event I have called the validation() function which is written on the plug-in.
$(document).ready(function()
{
$("#cmdSave").click(function ()
{
return $('#'+'<%=frmMainForm.ClientID %>').validation();
});
});
And here is my plug-in code which is used to check for the required field in the form. Here in the code I have first search the control which has .reg css class in the form by using the each of the jquery.
var blnIsError = true;
$('.req', this).each(function() {
if ($(this).val()== "")
{
$(this).addClass("ErrorMessage");
$(this)[0].title='Enter required field.';
blnIsError =false;
}
});

$('.req').bind("keyup", function()
{
if($(this).val() !='')
{
$(this).removeClass('ErrorMessage');
$(this)[0].title='';
}
});

return blnIsError;
Then in the function I have check the val() of the current control and if the value of the current control is empty string then add new class of css which has property of the background color and the border of the control to be set to red. After checking for the required field by using the reg css class, then I have bind keyup event to each of the reg control so if user enter the value in the control then the Error message class will be removed from that control.

You can download the source code from here

Note: In order to work with this plug-in you have to add reg. class with the control which are required field.
All and any comments / bugs / suggestions are welcomed!

Thursday, September 3, 2009

Adding and Binding A DropDownList Control In Footer of GridView Control

In this post I will show you how you can add DropDownList control in the grid view footer and also binding DropDownList control to the data source. Let us start with the example code. First you have to add the footer to the grid view control by setting the ShowFooter property to true. Next you have to add the dropDownList control to the footer of the any of the column in the grid view. Here I have added country DropDownList in the footer of the country column in the grid view control, this DropDownList control will contain the names of the countries in the grid view, by selecting the distinct country name from the current pages records. Here is the html code to add the DropDownList control in the footer of the country column in the grid view control.
<asp:TemplateField>
<HeaderTemplate >
<asp:Label ID="lblheader" runat="server" Text='Country'></asp:Label>
</HeaderTemplate>
<ItemTemplate>
<asp:Label ID="txtLabel" runat="server" Text='<%# Bind("Country") %>'></asp:Label>
</ItemTemplate>
<FooterTemplate>
<asp:DropDownList ID="ddlDropDownList" runat ="server" ></asp:DropDownList>
</FooterTemplate>
</asp:TemplateField>
And here is the code for the RowDataBound event of the grid view control, here I have first check for the row type , as I am looking for the footer row of the grid view control, So I check for the row type of footer, if current row is footer row then I will search for the ddlDropDownList control which is the dropDownList control added in the footer of the country column in the grid view control. After the FindControl I have check to see if the DropDownList Control is found or not if true, then I have set the DataSource and the DataTextField of the DropDownList control and then at the end I have call the DataBind of the DropwDownList control.

if (e.Row.RowType == DataControlRowType.Footer)
{
DropDownList ddlDropDownList = (DropDownList)e.Row.FindControl("ddlDropDownList");
if (ddlDropDownList != null)
{
ddlDropDownList.DataSource = dtsCustomer.Tables[1];
ddlDropDownList.DataTextField = "Country";
ddlDropDownList.DataBind();
}
}
Here is the output of the above work, You can see the DropDownList in the footer of the Country column of the grid view control.


You can download the source code from here

Note: In the Source code you can find script of a store procedure which you need to execute in the northwind database, And remember you have to replace the alter keyword with the Create so new store procedure will be created.
All and any comments / bugs / suggestions are welcomed!

Wednesday, September 2, 2009

Default Focused Control Asp.net

When developing the web application it is good idea that when form open then it should be set the focus to the some control. For example if you have user log-in form then it is nice if you set the focus on the user log-in name when form loaded. In this post I will show you the techniques used to set the default focus on control when control is first loaded.

First Way
:
With the release of the ASP.NET 2.0, the problem of making the default focus of the control is much easier with the introduction of the "default button" property of the form. Now you can use the defaultfocus attribute of the form. Here is sample HTML code that contains for the form :

<form defaultfocus="ControlID" runat="server">
With the above html code you can set the default focus control for the form. ASP.NET 2.0 provides three different new solutions if you need to set focus dynamically. At run time you can use Page.SetFocus method with control's ID as a parameter or you can simply call a new control's Focus method. They both do practically the same thing. It is only programmer's choice to choose which method likes more.

Second Way
In the second way of achieving default focus control functionality is the JavaScript way and below is the JavaScript code which is used to set the default focus control for the page. Here I have a simple function named "onBodyLoad" which is used to set the focus on the control when form is loaded.
function onBodyLoad()
{
var txtLoginName=document.getElementById('<%= txtLoginName.ClientID%>');
if(txtLoginName !=null)
txtLoginName.focus();
}
The above function can be called at body load or at the form load event, which is set the focus on the control.

Note :When using the master page in asp.net form, when you add new form in your application and check the option of selecting the master page , the newly added form don't have form or body tag it only contain asp:content control which don't have any onload event like the form and body have, so you can either use Page.SetFocus or control.Focus property.

You can download the source code from here.

Note : The download source only contain the JavaScript function .


All and any comments / bugs / suggestions are welcomed!


Wednesday, August 26, 2009

Default Submit Button Asp.net

When developing the desktop application it is very common that you set the default accept and cancel button for the window form. So that if user click the enter key then action take place like submission of the inputs entered by the user or other actions and when user click the esc key then the form close. In window form , form has two properties called accept button and cancel button which are used for this purpose. But when you want to give this type of functionality in the web application then there is little difference and more ways that you can give this functionality. In this post I will show you how you can give this functionality to user.

First Way
:
With the release of the ASP.NET 2.0, the problem of making the default button is much easier with the introduction of the "default button" property of the form. Now defaultbutton attribute can be used with <form> or <asp:panel> control. What button will be "clicked" depends of where actually cursor is and what button is chosen as a default button for form or a panel.Here is sample HTML code that contains one form and one panel control:

<form defaultbutton="buttonID" runat="server">
With the above html code you can set the default button for the form or to the panel control. In default button property you have to mention the ID of the button control which is used as the default button when enter key is pressed on the form or on the panel control.

Second Way
In the second of achieving default button functionality is the JavaScript way and below is the JavaScript code which is used to set the default button for the page. Here I have a simple function named "DefaultButton" which will return Boolean value of true or false depending on the
the value of the keycode, if 13 which is used as the enter key value, it will call the click event of the button which is set as the default button and return false else it will return true.
function DefaultButton()
{
if(event.which || event.keyCode)
{
if ((event.which == 13) || (event.keyCode == 13))
{
document.getElementById("<%=cmdSignIn.ClientID%>").click();
return false;
}
}
else
return true;
}
The default button function is registered against the onkeypress JavaScript of the form, So that keypress while focusing on any of the control on the form it will raise the click event of the button when the user click the enter key. You have to registered only one keypress event for the form no need to right code for every input control when they are in focus and has to manage the enter key for there own. You can download the source code from here.

All and any comments / bugs / suggestions are welcomed!

Tuesday, August 25, 2009

Fixed GridView Header Using CSS

In this post I will show you how you can fix the header of the grid so if user scroll down then the header will be in the view. Here is out of my example page and you can see that I have scroll down the grid and the grid header is in view so the user can see header text as he/she scroll down the grid.


And here is the my Css which is used to format the header of the grid in this Css class which is named GridHeader. The property which is used to fixed the position of the grid header is the Position property which has value relative.

.GridHeader
{
background-color: #738AAD;
border-bottom: 1px solid #00347B;
color: #FFFFFF;
height:25px;
font-weight: bold;
font-size:13px;
padding-left: 2px;
padding-top: 2px;
text-align: left;
position:relative ;
}

You can download the source code from here.

All and any comments / bugs / suggestions are welcomed!


Saturday, August 22, 2009

Returning Multiple Values From ModalDialog

In this post I will show you how you can call the showModalDialog to open the modal dialog and then how you can pass back the multiple values from the modal dialog. For this example I have two form one which is the main form and the second one is the modal dialog form which will be used to take the user input, I have only two field on modal dialog form the user name and the password and these two fields are return to the main form from the modal dialog form. In the main form I have only one button which is used to open the modal dialog and there label one to show the success or failure of the return value and the other two labels to show the user name and the password if user entered on the modal dialog. Here is my JavaScript which is used to open modal dialog and then check for the return values.

function OpenWindow()
{
var sFeatures ='dialogHeight=400px; dialogWidth=600px;center:yes;help:no;status=yes,toolbar=no,menubar=no';
var ErrorMessage = document.getElementById('lblErrorMessage');
var UserName= document.getElementById('lblUserName');
var Password = document.getElementById('lblPassword');
var returnValue=window.showModalDialog("frmModalDialog.aspx", '', sFeatures);

if(returnValue != null)
{
ErrorMessage .innerHTML='User Entered Values:';
ErrorMessage.className='InformationMessage';
UserName.innerHTML=returnValue.LoginName;
Password.innerHTML=returnValue.Password;
}
else
{
ErrorMessage.innerHTML='User didn\'t enter any value:';
ErrorMessage.className='ErrorMessage';
UserName.innerHTML=' ';
Password.innerHTML=' ';
}
return false;
}
Here is the syntax of the showModalDialog function. In the syntax of the show modal dialog the parameter which are enclosed in [ and ] are optional you can omit these parameters.

vReturnValue = object.showModalDialog(sURL [, vArguments] [, sFeatures])

Here is the detail of the parameter to the showModalDialog function.
  1. sURL:Required. String that specifies the URL of the document to load and display.
  2. vArguments:Optional. Variant that specifies the arguments to use when displaying the document. Use this parameter to pass a value of any type, including an array of values. The dialog box can extract the values passed by the caller from the dialogArguments property of the window object.
  3. sFeatures:String that specifies the window ornaments for the dialog box, using one or more of the following semicolon-delimited values:
Returns the value of the returnValue property as set by the window of the document specified in sURL, and type of the return value is Variant.
Here the JavaScript on the show modal form which is used to return value from the modal dialog. Here I have two function PassValuesBack and the CanclClick function. In the PassValueBack function which is bind with the sign in button and used to return value to the calling form. I have searched the txtLoginName and the txtPassword button and save them in the local variable so that there value can be send back to the calling form. Then I have created object and added LoginName and Password properties to that object and after assigning the user name and password to these properties respectively I have assign this object to the returnValue and close the window. In the CancelClick I have assign null to the returnValue and close window.
function PassValuesBack()
{
var txtLoginName= document.getElementById ('txtLoginName');
var txtPassword = document.getElementById('txtPassword');
var objReturnValue = new Object();
objReturnValue.LoginName =txtLoginName.value;
objReturnValue.Password = txtPassword.value;
window.returnValue = objReturnValue;
window.close();
}

function CancelClick()
{
window.returnValue = null;
window.close();
}

Now on the main form If user entered values and press sign in button then it will return values of the user login name and password, even if user didn't entered anything and press sign in button then the empty string is returned. On main form I have check for the null value of the returned variable, mean if user click on the close button on the modal dialog or click the cancel button then it will execute the else statement but if the return object is not null then get the value and assign to the label controls. You can download the source code from here.

Reference
  1. Show Modal Dialog Method
All and any comments / bugs / suggestions are welcomed!

Saturday, August 15, 2009

Populate dropdown based on selection of other dropdown in ASP.NET Using Jquery Json

I have used the Json technique to retrieve the server side records on the client side in my post Using Json in Asp.net Application, where I have explain how you can retrieve json data. Now here in this post i will use same example which is used in that post and show you how you can use the json of the jquery.For detail of the example you can visit my Using Json in Asp.net Application,post , here I will explain the JavaScript I have used to retrieve the values of the second dropdown list control. Here is my JavaScript code. In the code below I just bind the change event to the ddlRegion dropdown list control which also act as parent control. In the change event of the region dropdown list control, I have save the value of the region which is the id of the region and then build the url which consist of the page name plus the regionID and the sid as query string parameters.
$(document).ready(function()
{
$("#ddlRegion").change(function(){
var regionID = this.value;

var url="ResponsePage.aspx";
url=url+"?regionID="+ regionID;
url=url+"&sid="+Math.random();

$.getJSON(url, function(returnDataCollection)
{
$("#ddlTerritory")[0].innerHTML ='';
for(var intCounter=0; intCounter < returnDataCollection.length-1; intCounter++)
{
$("#ddlTerritory").append($("<option></option>").val(returnDataCollection[intCounter].TerritoryID ).html(returnDataCollection[intCounter].TerritoryDescription));
}
});
});
});

Next is the call to the $.getJSON function and here is the syntax of the $.getJSON function.
 $.getJSON(url[, data][, success]) 
Here are the detail of the parameter list which are passed to the function.
  • url: A string containing the URL to which the request is sent
  • data: (optional): A map of data that is sent with the request
  • success: (optional): A function that is executed if the request succeeds
And $.getJSON function return the XMLHttpRequest object that was created.The callback is passed the returned data, which will be a JavaScript object or array as defined by the JSON structure and parsed using the eval() function. Then in the success function I have loop through the array collection and add the values in the next dropdownlist control.You can download the source code from here.

All and any comments / bugs / suggestions are welcomed!

Saturday, August 8, 2009

Merge GridView Cells Or Columns in Row ASP.NET C#

During writing of my last post on the Custom Pager for GridView Control I have found very interesting article on merging the cells of the grid view control. In this post I will continue my work of Custom Pager for GridView Control, and extend it to merge the cells of the gridview control. I have used same source example of the Custom Pager for GridView Control post.
Here is the code which is used to merge the cell of the grid view control after the grid view control is filled with data, the code below is written in the databound event of the grid view control.

for (int intRowIndex = grdvCustomer.Rows.Count - 2; intRowIndex >= 0; intRowIndex--)
{
GridViewRow gvCurrnteRow= grdvCustomer.Rows[intRowIndex];
GridViewRow gvPreviousRow = grdvCustomer.Rows[intRowIndex + 1];
for (int intCellCount = 0; intCellCount < gvRow.Cells.Count; intCellCount++)
{
if (gvCurrnteRow.Cells[intCellCount].Text == gvPreviousRow.Cells[intCellCount].Text)
{
if (gvPreviousRow.Cells[intCellCount].RowSpan < 2)
gvCurrnteRow.Cells[intCellCount].RowSpan = 2;
else
gvCurrnteRow.Cells[intCellCount].RowSpan = gvPreviousRow.Cells[intCellCount].RowSpan + 1;
gvPreviousRow.Cells[intCellCount].Visible = false;
}
}
}
In the above code the logic of merging the cells is simple one. The for loop start from the second last row of the grid. Next is to declare the two GridViewRow objects by storing the second last and the last row from the grid view rows. Next is to compare the text of both the row and if the text both rows are equal then check the if the rowspan of the gvCurrentRow if it is less then 2 then assign it to 2 and if it is greater then 2 then assign the rowspan plus 1 of the previous row to the gvCurrentRow object and at the end set visible property of the gvpreviouse object to false.You can download the source code from here.

Reference
1- Merge GridView Cells Or Columns in Row ASP.NET C# VB.NET

All and any comments / bugs / suggestions are welcomed!


Calculating network bandwidth speed in C#

In this post I will tell you how to use the C# language to calculate the bandwidth. Here is my simple form which is used to display information about the network bandwidth speed. For this example I have only label controls on my form and one Timer control which is used to update the status of the network bandwidth after every second.


First here is the code which i have used to get the local area connection object from the GetAllNetworkInterfaces function and is a member function of the NetworkInterface class which Provides configuration and statistical information for a network interface. This class encapsulates data for network interfaces, also known as adapters, on the local computer. You do not create instances of this class; the GetAllNetworkInterfaces method returns an array that contains one instance of this class for each network interface on the local computer. In the default construct of the form, I have used the foreach loop to get the local area connection network interface. I have matched the name of the networkInterface and when it is found I have place it in the class variable so that I can used it later.
foreach (NetworkInterface currentNetworkInterface in NetworkInterface.GetAllNetworkInterfaces())
if (currentNetworkInterface.Name.ToLower() == "local area connection")
{
networkInterface = currentNetworkInterface;
break;
}
Here is the code which is called every tick of the time and used to update the label to show the internet status. Here in the first statement I have used the GetIPv4Statistic function of the network interface class , which will return the object of IPv4InterfaceStatistics class.From that object, we can fetch the BytesSent and BytesReceived from that network interface. By creating a simple timer that handles each tick rate in each 1sec interval, we can find the speed of bytes per second by finding the difference between the new bytes with respect to the previous ones. To make it more readable, we could convert bytes into kilobytes by dividing by 1024.

IPv4InterfaceStatistics interfaceStatistic = networkInterface.GetIPv4Statistics();

int bytesSentSpeed = (int)(interfaceStatistic.BytesSent - lngBytesSend) / 1024;
int bytesReceivedSpeed = (int)(interfaceStatistic.BytesReceived - lngBtyesReceived) / 1024;

lblSpeed.Text = (networkInterface.Speed / 1000000).ToString() + " Mbps";
lblPacketReceived.Text = interfaceStatistic.UnicastPacketsReceived.ToString();
lblPacketSend.Text = interfaceStatistic.UnicastPacketsSent.ToString();
lblUpload.Text = bytesSentSpeed.ToString() + " KB / s" ;
lblDownLoad.Text = bytesReceivedSpeed.ToString() + " KB / s ";
lngBytesSend = interfaceStatistic.BytesSent;
lngBtyesReceived = interfaceStatistic.BytesReceived;
After the calculation of the upload and download speed, the new values of the bytesSend and bytesReceived are save in the class variable so that next time these variable are used to calculate the upload and download speed.You can download the source code from here.

All and any comments / bugs / suggestions are welcomed!


Sunday, August 2, 2009

Fetching Comma Separated Value In One Column MSSQL

In this example i am going to describe how to combine multiple records in a column in MS SQL into one record comma separated.I have used the customer table of the northwind database. What I want to do is to get the Country name in one column and then in the second column I want to have company names separated by the comma. Here is the output of the simple select statement.
And here is the out put of the desired result.


Here is the script used to produce the comma separated values. Here I have first declared the local variable which is used to save the comma separated values and I have set the length of the variable to 1000, you can change it to your desired capacity. In the next statement I have used the @EmployeeNames variable to store the Comma separated value. And I have used the Coalesce function which is used to returns the first nonnull expression among its arguments.
Declare @EmployeeNames VARCHAR(1000)
Select @EmployeeNames=Coalesce(@EmployeeNames,'') + CompanyName +';' from Customers where country='UK'
Select distinct Country,@EmployeeNames As CompanyName from Customers where Country='UK'

And at the end I have used the simple select statement to fetch the record with the same where clause which is used in assigning the @EmployeeNames variable.

All and any comments / bugs / suggestions are welcomed!


Saturday, August 1, 2009

Custom Pager for GridView Control

When I have posted my post on the paging of the record on the sql server side, using the store procedure , I then decided to use that paged data in one of the web application. So I develop a small application to display the page data on the grid view control. During the development of the small application I have design the custom paging for the grid view control and I want to share this custom paging with all of you , So lets start with the small application.
For this example I have grid view control and I have set the visible property of the Pager to false, so the pager of the grid view is not shown to the user. Next is the custom pager for the grid view control which consist of the four image button First, last, next and previous and one label to show the current page number.

For this example code I have modified the store procedure used in the my post, so that I can get the number of records from the store procedure and display total number of page to user and also to perform action when user reaches on the last page.
Here is the main function which is used to control all the databinding and also control the paging as well, this code is taken from the GridBinding function. In the first statement of the function is the declaration of the SqlConnection object and passing the connection string to the connection object,I have passed the connection string directly to the SqlConnection object you can place your connection string to web.config on in a common place where all of you web application can access the connection string. Next is the declaration of the SqCommand object, the SqlCommand object is declared with zero (0) parameter constructor and then following are the properties set for the SqlCommand object.
  1. Connection Property
  2. CommandText
  3. CommandType
As I am using store procedure here for this example, so I have set the CommandText to the name of the store procedure and assign CommandType property the StoredProcedure enum constant.
SqlConnection getCustomerConnection = new SqlConnection("Server=ServerName; DataBase=northwind; uid=username; pwd=password");
getCustomerConnection.Open();

SqlCommand getCustomerCommand = new SqlCommand();
getCustomerCommand.Connection = getCustomerConnection;
getCustomerCommand.CommandText = "getCustomer";
getCustomerCommand.CommandType = CommandType.StoredProcedure;

getCustomerCommand.Parameters.AddWithValue("@PageNumber", PageNumber);
getCustomerCommand.Parameters.AddWithValue("@PageSize", grdvCustomer.PageSize);
SqlParameter totalRecordParameter = new SqlParameter("@TotalRecord", SqlDbType.Int);
totalRecordParameter.Direction = ParameterDirection.Output;
getCustomerCommand.Parameters.Add(totalRecordParameter);

SqlDataAdapter getCustomerDataAdapter = new SqlDataAdapter();
getCustomerDataAdapter.SelectCommand = getCustomerCommand;
DataSet dtsCustomer = new DataSet();
getCustomerDataAdapter.Fill(dtsCustomer, "Customer");

grdvCustomer.DataSource = dtsCustomer.Tables["Customer"];
grdvCustomer.DataBind();
TotalPages = Convert.ToInt32(getCustomerCommand.Parameters["@TotalRecord"].Value.ToString());
EnableDistableButtons();
After assigning the Connection, CommandText and CommandType properties of the SqlCommand Object, next is to add the parameter and their values, The first parameter is the @PageNumer, which is used to get the records for the value passed, Second parameter is the @PageSize , in this case I am passing the value of the PageSize property of the grid view control. And the last parameter which is @TotalRecord , this parameter has direction to output and is used to calculate the number of pages. Next is the declaration of the SqlDataAdatper object which is used to fill the DataSet, after the declaration and initialization of the sqlDataAdapter the SelectCommand of the SqlDataAdapter is assign the SqlCommand object which is declare before. After that DataSet object is declared and initialized and in the next statement the dataset is filled and "Customer" is passed as table name. After the fill of the dataset, DataSource property of the grid view control is assign the Customer table of the dataset.
After databind of the grid view control is the assignment of the total records to the TotalPage property and here is the code of the TotalPage property. In the Property it is only used to calculate the total pages by dividing the PageSize propery of the grid view control. Here you can see if the reminder of the TotalRecord and PageSize is not equal to zero(0) then it will increament the page size by one.
get
{
int intTotalPages = 1;
if (ViewState["TotalPages"] != null)
int.TryParse(ViewState["TotalPages"].ToString(), out intTotalPages);
return intTotalPages;
}
set
{
int intTotalPage = value /grdvCustomer.PageSize ;
if (value % grdvCustomer.PageSize != 0)
intTotalPage++;
ViewState.Add("TotalPages", intTotalPage);
lblShowingPage.Text = PageNumber + " of " + intTotalPage;
}
After the TotalPages property call is the function which is used to enable, disabled the first, previous, next and last image button depending on the value of the PageNumber property and the TotalRecords property. The code behind the first, previous, next and the last image button is simple , where the PageNumber property is changed and the GridBinding function is called.

You can download the source code from here.

Note: In the source I have place the script of the GetCustomer store procedure place execute this script in the nortwind database. And replace the alter key work to the create key work so that new store procedure will be created.

All and any comments / bugs / suggestions are welcomed!


Monday, July 27, 2009

Paging In Sql Server 2000 Store Procedure

You have heard or at least done Paging of the gridview control on the server side. When someone talk about the paging of the data on the sql server side I was surprise how to do the paging of the data on sql server side on in the store procedure which will return data. Then I have start search on doing paging of data on the store procedure side.
Here is piece of code which is used to create the store procedure and the name of the store procedure is GetCustomer. The store procedure will take two parameter one the PageNumber and the second one the PageSize. At the beginning of the store procedure is the declaration of the variable which are used in the store procedure. First is the StartingRow and the EndingRow variable which are used to return the pageSize records by comparing the StartingRow and The EndingRow with the RowNumber of the return result set. Next variable is the TotalRecods which is used to save the total of the records and used to calculate the row number as I have discuss in my last Post, where I have discuss how to calculate row number in sql server 2000 in detail.
ALTER PROCEDURE [GetCustomer]
@PageNumber INT,
@PageSize INT
AS
Declare @StartingRow INT,
@EndingRow INT,
@TotalRecords INT

Declare @tblTemporary TABLE
(
RowNumber INT,
CustomerID VARCHAR(10),
CompanyName NVARCHAR(200),
ContactName NVARCHAR(200),
Country NVARCHAR(50)
)

Set @TotalRecords =(Select Count(*) from Customers)
Set @EndingRow = @PageNumber * @PageSize
Set @StartingRow = @EndingRow - @PageSize

Insert INTO @tblTemporary
Select @TotalRecords -(Select Count(*) from Customers WHERE Customer.CustomerID < CustomerID) AS RowNumber,
CustomerID,CompanyName,ContactName,Country from Customers AS Customer

Select * from @tblTemporary
Where RowNumber> @StartingRow AND RowNumber <= @EndingRow
Next is the declaration of the table to save the return record set. Here I have included the required columns which I need to display to user plus the addition column RowNumber, which is used to filter the records based on the StartingRow and EndingRow. After the declaration of the variables next is the assignment statements. In the first of the assignment statement, TotalRow is assign value by selecting the Count(*) from the customer table.Next is to calculate the EndingRow value by multipling the PageNumber with PageSize and at the last assignment statement, calculating the StartingRow by substracting the PageSize from the EndingRow variable.
In the next statement, calculating the Row Number and required columns from the customer table and inserting the returned record in the @tblTemporary table. At the end of the store procedure selecting the records from the tblTemporary table and place the where clause so that the RowNumber of the tblTemporary table will be in between the StartingRow and EndingRow.

Note: Replace the alter keyword at the start of the store procedure with the create keyword so that new store procedure will be created.

The database for this store procedure is the northwind and table is the customer table. After creating the store procedure you can run these commands to see the result

exec getCustomer 1,25
exec getCustomer 2,25


All and any comments / bugs / suggestions are welcomed!