In this post I will show you how to use the Bing map control in the silverlight application to show the location on map. For this you have to download the SDK for the Bing map control from here. By downloading and installing the Bing map SDK on your system you will have the libraries and the SDK for the Bing map on your system.Now let us start to create the application to use the Bing map.
Now create an Silverlight application and named it I have set the name of the application " Using Map In Silverlight", you can set the name of your choice. Next step is to add the reference of the Bing map control libraries in the application. You can add the "Microsoft.Maps.MapControl.Common.dll" and "Microsoft.Maps.MapControl.dll" which are found in the "C:\Program Files\Bing Maps Silverlight Control\V1\Libraries" folder where you have installed the Bing map. Now add the following reference in your main page xaml. Now you have the reference in you xaml you can now place the map control in your page.
xmlns:map="clr-namespace:Microsoft.Maps.MapControl;assembly=Microsoft.Maps.MapControl"
List 1
Below is the code to add the Bing map control in the MainPage. Here you can see that I have set the properties of the map control which are the Zoom level, Copy right visibility , Logo visibility, Center of the map etc.
<map:Map  CopyrightVisibility="Collapsed" LogoVisibility="Collapsed" ZoomLevel="14"
                  Center="37.38763567060232,-6.001807451248469" Width="600" Height="400" VerticalAlignment="Center" HorizontalAlignment="Center" >
                <map:Pushpin PositionOrigin="37.38763567060232,-6.001807451248469"/>
            </map:Map>
Now run the application and you can see the output just like as shown in the Image 1, here you can see that it is showing message of Invalid credentials and asking for registration by following the URL given in the message. As I have not provide the credential for the Bing map so first registered and get the credentials from the URL given.
 |
| Image 1 |
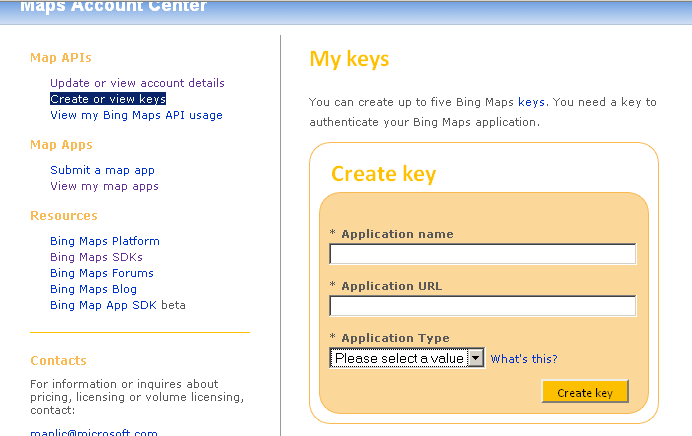
For the credentials go to the following URL , here you can see two option of one is to create new account For New User and Existing User if you have window live id then you can use the Existing user option to create Bing map account else if you don't have the window live id then you can create the window live id first and then create Bing Map account.I have window live ID so I click on the Existing user option which will ask me to enter live id and password. When you log in in the Bing map portal it will show you the account detail. Now click on the "Create or view keys" link on the left side just under the Map APIs which will new page displaying the option to create new key and also display the list of application name and the key if you have registered before.Below is the Image which is used to create the new key for the application. I have cute the list of application name and key from this image.
 |
| Image 2 |
In Image 2 you can see that I will ask you the Name of the application and also the URL of the application and the application type. Here you can give the name and the URL of your application and also the type of application, But remember if you create a key for your URL of local host then it will now used for the live URL, mean if you created the application and then host it live then same key is not used as the URL of the live application will changed. Now copy the key from there and paste it in the above xaml of the map control.
<map:Map  CopyrightVisibility="Collapsed" LogoVisibility="Collapsed" ZoomLevel="14"
                    CredentialsProvider="AoXaZoKhVUk_qMWVOcaUMOghcav3ZXJTTi5ttGqOcuoG_YNbaY40SKUK-zHpRl2_"
                   Center="37.38763567060232,-6.001807451248469" Width="600" Height="400" VerticalAlignment="Center" HorizontalAlignment="Center" >
                <map:Pushpin PositionOrigin="37.38763567060232,-6.001807451248469"/>
            </map:Map>
List 3
In the List 3 I have provide the CredentialProvider property of the map control, here you can note the key which you can get from the bind map portal.I also added the Pushpin (Two doubles separated by an comma (,)that are the latitude and longitude values of the coordinate of the pushpin) tag in the map control so that a pushpin is also displayed in the map control.
 |
| Image 3 |
Now the final output can be seen in the Image 3, Here you can see that the message is not displayed as In Image 1. Pushpin is also displaying as we have set the latitude and longitude in the pushpin PositionOrigin property.You can download the source code from here.
All and any comments / bugs / suggestions are welcomed!